

11:41:00 PM
The ability to control the flow of your program, letting it make decisions on what code to execute, is valuable to the programmer. The if statement allows you to control if a program enters a section of code or not based on whether a given condition is true or false. One of the important functions of the if statement is that it allows the program to select an action based upon the user's input. For example, by using an if statement to check a user entered password, your program can decide whether a user is allowed access to the program.
Without a conditional statement such as the if statement, programs would run almost the exact same way every time. If statements allow the flow of the program to be changed, and so they allow algorithms and more interesting code.
Before discussing the actual structure of the if statement, let us examine the meaning of TRUE and FALSE in computer terminology. A true statement is one that evaluates to a nonzero number. A false statement evaluates to zero. When you perform comparison with the relational operators, the operator will return 1 if the comparison is true, or 0 if the comparison is false. For example, the check 0 == 2 evaluates to 0. The check 2 == 2 evaluates to a 1. If this confuses you, try to use a cout statement to output the result of those various comparisons (for example cout<< ( 2 == 1 );)
When programming, the aim of the program will often require the checking of one value stored by a variable against another value to determine whether one is larger, smaller, or equal to the other.
There are a number of operators that allow these checks.
Here are the relational operators, as they are known, along with examples:
It is highly probable that you have seen these before, probably with slightly different symbols. They should not present any hindrance to understanding. Now that you understand TRUE and FALSE in computer terminology as well as the comparison operators, let us look at the actual structure of if statements.
>     greater than              5 > 4 is TRUE
<     less than                 4 < 5 is TRUE
>=    greater than or equal     4 >= 4 is TRUE
<=    less than or equal        3 <= 4 is TRUE
==    equal to                  5 == 5 is TRUE
!=    not equal to              5 != 4 is TRUE
The structure of an if statement is as follows:
To have more than one statement execute after an if statement that evaluates to true, use braces, like we did with the body of a function. Anything inside braces is called a compound statement, or a block.
if ( TRUE )
 Execute the next statement
For example:
There is also the else statement. The code after it (whether a single line or code between brackets) is executed if the if statement is FALSE.
if ( TRUE ) {
 Execute all statements inside the braces
}
It can look like this:
One use for else is if there are two conditional statements that may both evaluate to true, yet you wish only one of the two to have the code block following it to be executed. You can use an else if after the if statement; that way, if the first statement is true, the else if will be ignored, but if the if statement is false, it will then check the condition for the else if statement. If the if statement was true the else statement will not be checked. It is possible to use numerous else if statements.
if ( TRUE ) {
 // Execute these statements if TRUE
}
else {
 // Execute these statements if FALSE
}
Let's look at a simple program for you to try out on your own.
Boolean operators allow you to create more complex conditional statements. For example, if you wish to check if a variable is both greater than five and less than ten, you could use the boolean AND to ensure both var > 5 and var < 10 are true. In the following discussion of boolean operators, I will capitalize the boolean operators in order to distinguish them from normal english. The actual C++ operators of equivalent function will be described further into the tutorial - the C++ symbols are not: OR, AND, NOT, although they are of equivalent function.
#include

using namespace std;

int main()                            // Most important part of the program!
{
 int age;                            // Need a variable...

 cout<<"Please input your age: ";    // Asks for age
 cin>> age;                          // The input is put in age
 cin.ignore();                       // Throw away enter
 if ( age < 100 ) {                  // If the age is less than 100
    cout<<"You are pretty young!\n"; // Just to show you it works...
 }
 else if ( age == 100 ) {            // I use else just to show an example
    cout<<"You are old\n";           // Just to show you it works...
 }
 else {
   cout<<"You are really old\n";     // Executed if no other statement is
 }
 cin.get();
}
When using if statements, you will often wish to check multiple different conditions. You must understand the Boolean operators OR, NOT, and AND. The boolean operators function in a similar way to the comparison operators: each returns 0 if evaluates to FALSE or 1 if it evaluates to TRUE.
NOT: The NOT operator accepts one input. If that input is TRUE, it returns FALSE, and if that input is FALSE, it returns TRUE. For example, NOT (1) evalutes to 0, and NOT (0) evalutes to 1. NOT (any number but zero) evaluates to 0. In C and C++ NOT is written as !. NOT is evaluated prior to both AND and OR.
AND: This is another important command. AND returns TRUE if both inputs are TRUE (if 'this' AND 'that' are true). (1) AND (0) would evaluate to zero because one of the inputs is false (both must be TRUE for it to evaluate to TRUE). (1) AND (1) evaluates to 1. (any number but 0) AND (0) evaluates to 0. The AND operator is written && in C++. Do not be confused by thinking it checks equality between numbers: it does not. Keep in mind that the AND operator is evaluated before the OR operator.
OR: Very useful is the OR statement! If either (or both) of the two values it checks are TRUE then it returns TRUE. For example, (1) OR (0) evaluates to 1. (0) OR (0) evaluates to 0. The OR is written as || in C++. Those are the pipe characters. On your keyboard, they may look like a stretched colon. On my computer the pipe shares its key with \. Keep in mind that OR will be evaluated after AND.
It is possible to combine several boolean operators in a single statement; often you will find doing so to be of great value when creating complex expressions for if statements. What is !(1 && 0)? Of course, it would be TRUE. It is true is because 1 && 0 evaluates to 0 and !0 evaluates to TRUE (ie, 1).
Try some of these - they're not too hard. If you have questions about them, feel free to stop by our forums.
If you find you enjoyed this section, then you might want to look more at Boolean Algebra.
A. !( 1 || 0 )         ANSWER: 0
B. !( 1 || 1 && 0 )    ANSWER: 0 (AND is evaluated before OR)
C. !( ( 1 || 0 ) && 0 )  ANSWER: 1 (Parenthesis are useful)
ReadMore...
11:28:00 PM
Getting set up
C++ is a programming language of many different dialects, similar to the way that each spoken language has many different dialects. In C++, dialects are not because the speakers live in the North or South. Instead, it is because there are many different compilers that support slightly different features. There are several common compilers: in particular, Borland C++, Microsoft C++, and GNU C++. There are also many front-end environments for the different compilers--the most common is Dev-C++ around GNU's G++ compiler. Some, such as G++, are free, while others are not. Please see the compiler listing for more information on how to get a compiler and set it up.Each of these compilers is slightly different. Each one should support the ANSI/ISO standard C++ functions, but each compiler will also have nonstandard functions (these functions are similar to slang spoken in different parts of a country). Sometimes the use of nonstandard functions will cause problems when you attempt to compile source code (the actual C++ written by a programmer and saved as a text file) with a different compiler. These tutorials use ANSI/ISO standard C++ and should not suffer from this problem (with sufficiently modern compilers). Note that if you are using an older compiler, such as TCLite, you should read check out some compatability issues.
If you don't have a compiler, I strongly suggest that you get one. A simple compiler is sufficient for our use, but make sure that you do get one in order to get the most from these tutorials. The page linked above, compilers, lists compilers by operating system.
C++ is a different breed of programming language. A C++ program begins with a function, a collection of commands that do "something". The function that begins a C++ program is called main; this function is always called when the program first executes. From main, we can also call other functions whether they be written by us or by others. To access a standard function that comes with the compiler, you include a header with the #include directive. What this does is effectively take everything in the header and paste it into your program. Let's look at a working program:
Let's look at the elements of the program. The #include is a "preprocessor" directive that tells the compiler to put code from the header called iostream into our program before actually creating the executable. By including header files, you an gain access to many different functions. For example, the cout function requires iostream. Following the include is the statement, "using namespace std;". This line tells the compiler to use a group of functions that are part of the standard library (std). By including this line at the top of a file, you allow the program to use functions such as cout. The semicolon is part of the syntax of C and C++. It tells the compiler that you're at the end of a command. You will see later that the semicolon is used to end most commands in C++.
#include


using namespace std;


int main()

{

cout<<"HEY, you, I'm alive! Oh, and Hello World!\n";  cin.get(); }
The next imporant line is int main(). This line tells the compiler that there is a function named main, and that the function returns an integer, hence int. The "curly braces" ({ and }) signal the beginning and end of functions and other code blocks. If you have programmed in Pascal, you will know them as BEGIN and END. Even if you haven't programmed in Pascal, this is a good way to think about their meaning.
The next line of the program may seem strange. If you have programmed in another language, you might expect that print would be the function used to display text. In C++, however, the cout object is used to display text. It uses the << class="example">
#include
using namespace std;
int main()
{
cout<<"HEY, you, I'm alive! Oh, and Hello World!\n"; cin.get(); return 1; }
You might start playing around with the cout function and get used to writing C++.
Comments are critical for all but the most trivial programs and this tutorial will often use them to explain sections of code. When you tell the compiler a section of text is a comment, it will ignore it when running the code, allowing you to use any text you want to describe the real code. To create a comment use either //, which tells the compiler that the rest of the line is a comment, or /* and then */ to block off everything between as a comment. Certain compiler environments will change the color of a commented area, but some will not. Be certain not to accidentally comment out code (that is, to tell the compiler part of your code is a comment) you need for the program. When you are learning to program, it is useful to be able to comment out sections of code in order to see how the output is affected.
So far you should be able to write a simple program to display information typed in by you, the programmer and to describe your program with comments. That's great, but what about interacting with your user? Fortunately, it is also possible for your program to accept input. The function you use is known as cin, and is followed by the insertion operator >>.
Of course, before you try to receive input, you must have a place to store that input. In programming, input and data are stored in variables. There are several different types of variables; when you tell the compiler you are declaring a variable, you must include the data type along with the name of the variable. Several basic types include char, int, and float.
A variable of type char stores a single character, variables of type int store integers (numbers without decimal places), and variables of type float store numbers with decimal places. Each of these variable types - char, int, and float - is each a keyword that you use when you declare a variable.
Sometimes it can be confusing to have multiple variable types when it seems like some variable types are redundant. Using the right variable size can be important for making your code readable and for efficiency--some variables require more memory than others. For now, suffice it to say that the different variable types will almost all be used!
To declare a variable you use the syntax type
Here are some variable declaration examples:
int x;

int a, b, c, d;

char letter;

float the_float;
While you can have multiple variables of the same type, you cannot have multiple variables with the same name. Moreover, you cannot have variables and functions with the same name.
Here is a sample program demonstrating the use a a variable:
Let's break apart this program and examine it line by line. The keyword int declares thisisanumber to be an integer. The function cin>> reads a value into thisisanumber; the user must press enter before the number is read by the program. cin.ignore() is another function that reads and discards a character. Remember that when you type intput into a program, it takes the enter key too. We don't need this, so we throw it away. Keep in mind that the variable was declared an integer; if the user attempts to type in a decimal number, it will be truncated (that is, the decimal component of the number will be ignored). Try typing in a sequence of characters or a decimal number when you run the example program; the response will vary from input to input, but in no case is it particularly pretty. Notice that when printing out a variable quotation marks are not used. Were there quotation marks, the output would be "You Entered: thisisanumber." The lack of quotation marks informs the compiler that there is a variable, and therefore that the program should check the value of the variable in order to replace the variable name with the variable when executing the output function. Do not be confused by the inclusion of two separate insertion operators on one line. Including multiple insertion operators on one line is perfectly acceptable and all of the output will go to the same place. In fact, you must separate string literals (strings enclosed in quotation marks) and variables by giving each its own insertion operators (<<). Trying to put two variables together with only one <<>, <. The * multiplies, the - subtracts, and the + adds. It is of course important to realize that to modify the value of a variable inside the program it is rather important to use the equal sign. In some languages, the equal sign compares the value of the left and right values, but in C++ == is used for that task. The equal sign is still extremely useful. It sets the left input to the equal sign, which must be one, and only one, variable equal to the value on the right side of the equal sign. The operators that perform mathematical functions should be used on the right side of an equal sign in order to assign the result to a variable on the left side. Here are a few examples:
#include


using namespace std;


int main()

{

int thisisanumber;


cout<<"Please enter a number: ";  cin>> thisisanumber;

cin.ignore();

cout<<"You entered: "<<>
The other form of equal, ==, is not a way to assign a value to a variable. Rather, it checks to see if the variables are equal. It is useful in other areas of C++; for example, you will often use == in such constructions as conditional statements and loops. You can probably guess how <> function. They are greater than and less than operators.
a = 4 * 6; // (Note use of comments and of semicolon) a is 24

a = a + 5; // a equals the original value of a with five added to it

a == 5     // Does NOT assign five to a. Rather, it checks to see if a equals 5.
For example:
a <> 5  // Checks to see if a is greater than five

a == 5 // Checks to see if a equals five, for good measure
ReadMore...
11:23:00 PM
This tutorial uses Photoshop CS2 however it is also suitable for PSCS and PS7 users.
Using a basic circle, this tutorial will demonstrate some of the effects that the Layer Style options is used to create.
This tutorial is large(36 pages) and is available in PDF Format. DOWNLOAD BY CLICKING HERE
You can download Adobe Acrobat Reader for free if required from www.adobe.com
ReadMore...
11:16:00 PM
This tutorial will help you create a basic round glass ornament, just in time for the holidays.
1. Begin by creating a new image in the dimensions you want. Be sure to click Raster Background and Transparent.
2. Activate the Ellipse Tool (Q) and choose a background color you want your ornament to be. Draw a vector circle and center it vertically on your layout using the Object Selection Tool (O).
3. Duplicate the vector circle onto a new layer by right-clicking on the layer containing the circle and choosing Duplicate.
4. Expand the layer containing the duplicated circle by clicking the plus sign located on the left side of the layer.

5. You should now see the sub-layer containing the vector circle.
6. Double-click the sub-layer containing the duplicated circle (be sure you click the sub-layer and not the Vector layer). Once you double-click the sub-layer containing the circle, you should see the following window:
7. Click the fill block on the bottom and choose the Gradient tab. Choose the black-white gradient. Enter 180 for the Angle, Repeats = 0, check Invert, Linear style. Click OK.
8. The duplicated circle should now have changed to the black-white gradient.
9. Change the blend mode for the black-white gradient to Hard Light (try experimenting with different blend modes for various looks).
10. Your ornament should now look like this:
11. Let’s give the ornament a shinier glass look. Create a selection by activating the Object Selection tool (O) and Ctrl+Shift+B. Your circle should now have marching ants surrounding it.
12. Create a new Raster layer (Layers > New Raster Layer > OK).
13. Expand the selection by clicking Selections > Modify > Expand. Expand the selection by 2 pixels. Click OK. The marching ants should now be on the outside of your circle.
14. Create a shiny glass look by clicking on Effects > Artistic Effects > Balls and Bubbles. On the Shape tab, choose the Single ball or bubble and check Maximum possible size.
15. Click the Illumination tab and fill in with the following settings:

16. Click OK. Change the blend mode for this layer to Overlay. You should now have a shinier surface on your ornament.

17. Click on the layer containing your original circle. Then using the Magic Wand tool, click on the outside of the circle, selecting the area surrounding the circle.
18. Click the layer containing the glassy bubble and hit the delete key on your keyboard. Merge visible layers (Layers > Merge > Merge Visible).
19. At this point, you could save the image as a PNG file and use it as is. Or, you can create the metal hanging cap.
20. Choose the Rectangle tool (G). For the background color, choose the Metal steel gradient, linear style, angle = 90, check Invert. Click OK.
21. Draw a small rectangle at the top of the ornament and center it vertically using the Object Selection tool (O).
22. Convert the rectangle into a raster (Layers > Convert to Raster Layer). Apply an inner bevel with the following settings and click OK.
23. Your ornament should now have a metallic cap on top.
24. Create a hanging loop by using the Ellipse tool (Q) and drawing a thin ellipse using the same Metal steel gradient as your stroke color. Move the layer containing the loop below the cap so that it sits behind the cap.

25. Apply an inner bevel to the loop and click OK.
26. Merge all visible layers and save as a PNG file. Your ornament is now ready for “hanging!”
ReadMore...
10:44:00 PM
Most, if not all of the permanent topics of conversation on XML-DEV revolve around two camps of people: one which thinks aspect N of XML is a wart, the other which thinks N is an elegance. These threads never end because, in part, there is no final or absolute context within which XML is meant to be used. Whether you think of N as a wart or an elegance is context dependent and interest relative. It depends almost entirely on who you are and what you want and need XML to do. In other words, all opinions about XML are equal. Except that that's not really true. All opinions about XML are equal, except some are more equal than others. Among the more equal opinions are ones held by the people who drafted the XML specification. Among that select group of people, as far as XML-DEV is concerned, Tim Bray stands out, if for no other reason than he has consistently contributed to the conversational life of the community. So when Bray, over the course of a few weeks, leads an effort to relocate XML-DEV and publishes a widely-read essay in which he seems to question XML itself, it's time to take a closer look. In a recent weblog entry, one which has been picked up by Slashdot, Bray asks whether XML has become too hard for programmers. Faced with writing code "to process arbitrary incoming XML", Bray confesses that the experience was "irritating, time-consuming, and error-prone" -- quite an admission from someone as instrumental in the creation of XML as Bray. The point here -- before someone accuses me of hero worship -- isn't that Tim Bray is always right. He isn't. The point is that when Tim Bray starts talking about XML's problems, it makes sense for the XML development community to pay some attention. So what's Bray's beef? It isn't, he says, that XML parsers are so hard to write. If they were, Bray says, there wouldn't be so many of them (which doesn't strictly follow, logically speaking, but it may be a useful heuristic). The problem is that XML parsers are so hard to use. (I wrote about a similar issue -- the difficulty of SAX or DOM for some kinds of programmer -- in one of my first XML-Deviant columns, "DOM and SAX Are Dead, Long Live DOM and SAX".) Specifically, Bray offers the standard lament: DOM processing is inefficient, SAX processing is awkward. What? Bray "parses" XML with regular expressions? Apparently so, at least for some data munging tasks at Antartica, his data-mapping company. He's even written some code to make regexing XML more reliable: Bray's preferred way of parsing XML for some kinds of project, like his weblog software, would be to have a kind of regular expression syntax which "abstracts away all the XML syntax weirdness, ignoring line-breaks, attribute orders, choice of quotemarkers and so on". While his example is Perl, it's not Perl-specific. "I want to have my idiomatic regexp cake," Bray says, "and eat my well-formed XML goodness too". XML-DEV reacted to Bray's essay in a relatively muted way, perhaps because it was busy discussing his proposal to relocate XML-DEV? Simon St. Laurent suggested that Bray's lament reflects the different expectations and assumptions which follow from the markup and programming worlds. Dare Obasanjo took Bray to task, suggesting that what Bray is asking for is already available in Java and C# (and, as Daniel Veillard pointed out, in libxml2 and so in any language, like Python, which has libxml2 bindings; likewise, Sean McGrath reminded XML-DEV that this processing style is available in his Pyxie Python toolkit), namely, a "pull-based XML parser". Obasanjo went even further: Micah Dubinko takes a different approach, noting that part of the difficulty of parsing some kinds of XML is handling Two very substantial posts, by Robin Berjon and Barrie Slaymaker, responded specifically to Perl-specific part of Bray's comments. Berjon makes the obvious point: Which is especially telling (and rather funny) if you remember classics which asked whether "wily Perl hackers" could handle XML. Berjon's primary suggestion is to commend Barrie Slaymaker's This sounds an awful lot like the kind of thing Bray is asking for. If you're a Perl-XML hacker, you could do far worse than paying very close attention to Barrie Slaymaker's post about Is XML Too Hard?
If I use any of the perl+XML machinery, it wants me either to let it read the whole thing and build a structure in memory, or go to a callback interface.
Since we're typically reading very large datasets, and typically looking at the vast majority of it, preloading it into a data structure would be impractical not to say stupid. Thus we'd be forced to use parser callbacks of one kind or another, which is sufficiently non-idiomatic and awkward that I'd rather just live in regexp-land. Now here's the dirty secret; most of it is machine-generated XML, and in most cases, I use the perl regexp engine to read and process it. I've even gone to the length of writing a prefilter to glue together tags that got split across multiple lines, just so I could do the regexp trick.
Tim's post indicates that he is quite disconnected from the world of modern XML programming practices, I especially like his "The notion that there is an 'XML data model' is silly and unsupported by real-world evidence" quote. I'm interested in what criteria he used to determine that the thousands of users of XPath, XSLT and the DOM don't count as "real-world evidence".
ID values. One of the changes that might be made to XML to make it less painful to process is to fix the ID issue. As Dubinko puts it, Anyone who's worked much with XML knows that IDs are painful, since they require DTD or schema processing. A recurring proposal has been circulating for a self-describing xml:id attribute that confers ID-ness without need of DTD or schema. With that in place, even XML delivered inside the DTD-free zone of a SOAP envelope could be handled with code not significantly more complex than Adam's example, and without the dependencies and hassle of a schema language.
A couple years after you think you and your friends have convinced all the Perl community to not use regex based parsers on XML you get Tim Bray to hit you on the back of the head with one. I guess it's fair though, because he makes sense.
XML::Filter::Dispatcher module: It is basically a collection of utilities wrapped inside rules that match an XML stream using an XPath-like language (which is probably preferable to raw regexen, and has in fact similar functionality). They will do things such as maintain state for you or assist you doing so, in a way that is much simpler than SAX. You need to learn a new little language, but if you know XPath it's a five minute job. I don't think the docs do it full justice.
XML::Filter::Dispatcher and XML::Essex. I can only quote some of its highpoints here, but it definitely deserves a careful reading. XML::Essex is "a prototype of a pull mode scripting environment ... that is also event driven so it allows while ( pull ) style processing without reading the entire document (via Perl's newish ithreads)". That is, it is meant to allow Perl programmers to deal with XML files in much the same way as they'd deal with other text files. It is, Slaymaker says, "an attempt to build a toolkit that allows processing XML files in the same way that you would process a text file, modulo the fact that text files are treated as flat sequences of records in Perl while XML is hierarchical". Again, if you're interested in Bray's lament specifically for its Perl-angle, you should take a careful look at Barrie Slaymaker's recent work.
ReadMore...
10:36:00 PM
The previous three editions of XML-Deviant reviewed Web Forms 2.0, or WF2, a Member Submission made to the W3C by a loose group called The Web Hypertext Application Technology Working Group, often abbreviated WHATWG. This week, continuing a web application theme leading up to the XTech Conference, XML-Deviant takes a look at the issues involving the broader internet application community. The first stop is the W3C Team Comment on WF2. Normally, the W3C won't acknowledge a Member Submission if it falls under the domain of an existing Working Group--in that case the submission should be made directly to the Working Group in question. As the lead-in quote shows, though, the submission was acknowledged. Additionally, the Team Comments offered a few specific suggestions: While a good starting point, these comments by nature are addressed only to the WHATWG. That group didn't form in a vacuum; it formed as a response to pre-existing conditions in the community. Accordingly, any one-sided plan for change is simply doomed. On the other hand, the group is specifically asking for comments, so nobody should be surprised if some of the comments point to WF2. Even then, however, it's worth thinking about the wider implications of suggested changes. So with that, the remainder of this column offers some specific points for discussion and alignment within the community. Point: Where the state goes. Earlier, this column's review of WF2 introduced FormAttic, a simple framework for client-side forms validation, in order to highlight an important discussion about the design of forms languages: namely, that new features require new information to be specified somewhere in a target document. FormAttic placed all the additional information in one place, in the document head. WF2 places the information across many elements throughout the document. Lots of ink could be spilled over discussions about which way is better. But the interesting thing is that the existing XForms specification already caters to both ways. A fully specified XForms Model appears in one place in the document head, but for cases when that is too heavyweight, a technique called (with tongue firmly in cheek) lazy author style allows the scattered form control elements themselves to contain all the needed information. XForms and WF2 are more closely related than has been credited. Without serious changes to either specification, they could be even more so. Point: Common foundation. The XForms Model, which is in turn based on the XPath data model and the XML Infoset, provides a common dictionary of terms for specifications and implementers to use. Note that this doesn't automatically imply the need to use XPath itself, only the data model, which in practical terms only means writing specifications a certain way and using certain terminology. The result will be that developers familiar with WF2 will have an immediate familiarity with XForms, and vice versa. Additional areas of overlap, especially around serialization and submission handling, can also be more easily identified this way. Many of the improvements found in areas of WF2 fit in with current work on the XForms 1.1 Working Draft. Point: Common framework. WF2 is defined in terms of Modularization of XHTML, a framework for mixing and matching different parts of XML vocabularies. Without using a separate heavyweight specification, XForms uses another layer on top of XHTML Modularization to mix and match form-specific components. The result is diagrams like this puzzle piece, which as far back as 2001 already showed XHTML as an option for user interface. It should be possible to use the updated UI controls defined in WF2 with the rest of the XForms core, not to mention other kinds of combinations. Point: Discard the WF2 repeat model in favor of the existing one. Previously I wrote about the WF2 repeat model, which has some shortcomings besides being duplicative. The WF2 submission itself acknowledges: "There is some debate about whether the repetition model section should be included or not." Point: Acknowledge the need for a transition. This might be the hardest point for both respective sides to come to terms with, yet in some respects it's the easiest since it involves only editing one's viewpoint as opposed to editing a specification or working code. Perhaps Gerald Weinberg's Second Law of Consulting sums it up best: "No matter how it looks at first, it's always a people problem." The huge quantity of existing code, markup, practice, and W3C Recommendations speaks for itself. So does the demand for more advanced solutions. There are valid 'before' and 'after' states in this discussion, which points to the need for a bridge between the two. Another area of common ground comes from scripting, which any kind of client-side transition plan will involve. Work like FormFaces or DENG feel eerily similar to the kind of preliminary work going into WF2, such as that from the remarkable Dean Edwards. It doesn't take a big imaginative leap to visualize these kinds of projects coming together. Point: Unify the community. One community working out these issues will be better than two or n, even though compromises will need to happen. The W3C might often get criticized for producing cumbersome "design-by-committee" specifications, but it still holds a leadership role in web applications standards space. If that weren't the case, the WHATWG wouldn't have made a Member Submission out of WF2 in the first place. The proprietary forms market is fractious enough. Let's not have the standards-based forms sector be the same way. In preparing this article, I was stuck by how many areas of common ground exist between XForms and WF2, much more so than reading either specification alone would indicate. Still, not enough work has gone into identifying and expanding these areas. This is where XML-Deviant readers can help. In the comments section below or in your weblog, post some constructive comments, markup samples, or other ideas on how to move this community forward. A later issue of XML-Deviant will report on the progress. OpenReader announcement: Open-standards eBook Format and Reading System Uche Ogbuji's latest article, Principles of XML Design: When the Order of XML Elements Matters, which spawned a useful thread on xml-dev this week. How to implement Google Maps (and other Ajax patterns) with XForms. For more information on Gerald Weinberg's Laws of Consulting, see The Secrets of Consulting.1. Consider separating the backwards-compatible features from the features that require users to update their user agents or rely on scripting.
2. Provide comprehensive use cases and requirements for each enhancement.
3. Demonstrate how Web Forms 2.0 maps to XForms (and the reverse), giving more attention to the features in Web Forms 2.0 that are similar to XForms.
4. Participate in the development of XHTML and XForms specifications (note that Opera has been a member of the HTML Working Group for 4 years.)
5. Build a community, with cooperation from the W3C, to discuss, develop and promote adoption of improved forms on the Web.
Conclusion
Births, Deaths, and Marriages
New discussion groups for Open-standards eBook Format development as well as a reference implementation.
Documents and Data
ReadMore...
10:19:00 PM
Chapter 5: Managing Spam
Most people consider spam to be any unsolicited e-mail that they might receive that attempts to sell them something1. It can also include e-mails with chain letters, political statements, or messages from people who just need some attention. Although some people might think that the e-mail version of spam was named after the food SPAM,2 because both are considered tasteless and a waste of time (at least to some people), nothing could be further from the truth. (As an aside, SPAM is served during breakfast at McDonald's in Hawaii, where it has the highest consumption rate per capita in the United States.2)
The origin of the use of the term spam for unsolicited e-mail appears to come from the Monty Python skit about SPAM3. The Vikings in the skit annoyed a waitress by repeating the word spam over and over again. In much the same way, unsolicited e-mail can elicit the feeling of annoyance in people who receive it. The way in which the Monty Python skit was connected to the act of unsolicited communication came from the Multi-User Dungeon (MUD)4 community. One member of that community, after becoming upset with his treatment by some of the other members, created a macro to repeat the word spam several times in the MUD environment during a sacred hatching. Later on, MUD members would refer to the event as the time they got "spammed."
Spam As a Privacy Issue
In 1928, Justice Louis D. Brandeis wrote, "They conferred, as against the government, the right to be left alone—the most comprehensive of rights and the right most valued by civilized men."5 The right to be left alone became the battle cry of many privacy advocates. Spam is considered an invasion of a right that is categorized as communication privacy.6 Just as you would not want a stranger knocking on your door, calling you on the phone, or following you down the street, receiving unsolicited mail is an infringement of your right to be left alone. The receipt of spam can also be considered a violation of your right to determine for yourself when, how, and to what extent information about you is used.7
Users should always be in charge of how and when they are contacted. Even after agreeing to be contacted, users should be able to opt out of future contacts. Continuing to contact someone after he or she has opted out of contact, or not providing a way to opt out of contact, is akin to electronic stalking. Respecting your customers' privacy is a good way to earn their trust and their loyalty. As a consumer, demand that online services respect your privacy. This chapter provides several ways for you to fight back against spammers and discusses how to send commercial e-mail without becoming a bane of society.
The Cost of Spam
The processing of spam has become a major issue for most companies and consumers. The time it takes to process spam is not only a distraction, it is also a source of lost productivity that is affecting bottom lines. According to a recent survey, the effort being applied to managing spam will cost companies $8.9 billion yearly, with $650 million being spent on antispam and content-filtering products alone in 2003.8 Even if you are simply reading the subject line and the sender's name of an e-mail, it takes time to determine whether an e-mail is a legitimate message to you. Often a cursory scan of the subject line is not enough, and you are forced to open some e-mails to determine their validity. This converts to lost man hours processing unsolicited and unwanted e-mail. There is also a cost associated with processing each e-mail where it enters a company or an Internet service provider (ISP). For example, if it takes four servers to process one million e-mails per hour and half of the e-mail being received is spam, then half of your equipment costs are basically going to process e-mails that rarely benefit anyone. You also have to consider the electrical power, maintenance, administration, and storage costs for the extra equipment you have to purchase just to keep up with the additional e-mail traffic that you have to process.
Consider some numbers: Nortel Networks indicates that 70 percent to 80 percent of the e-mail that they receive each day is spam, and the rate of spam doubles every 4 to 6 weeks. This costs them about $1,000 to $5,000 per day. Aristotle Inc., a small ISP in Little Rock, Arkansas, indicated that spam costs the company $5 per customer per year. The annual cost to pay for new technology and manpower to manage the spam problem comes to $112,000 a year just for that ISP.9
A report by London-based security firm mi2G shows that spam caused more economic damage than hackers and viruses in October 2003. The report goes on to say that spam caused $10.4 billion in economic losses worldwide, whereas viruses and worms caused $8.4 billion in losses, and hackers $1 billion in losses. Not only have spammers been filling the inboxes of corporations, they have also started attacking operators of spam block lists, which are providers that assist companies with detecting unsolicited e-mail. Spammers are flooding servers of the block list operators with spam attacks, forcing them to shut down. This is leading to increased costs to acquire more bandwidth and protection, costs that will probably have to be passed along to customers.10
Spam Litigation
Many states and even foreign governments are passing antispam laws. Virginia went so far as to make sending unsolicited e-mail a felony for egregious offenses. A conviction can lead to a prison term of one to five years, a hefty fine, and a seizure of profits and income from the sale of spam advertising.
Companies have also successfully used legal action to extract damages from spammers. EarthLink was awarded $16.4 million from Howard Carmack for using EarthLink services to send 825 million pieces of spam. EarthLink was also awarded $25 million in damages in a suit against Kahn C. Smith. Both individuals have been banned from sending future spam." America Online has won 25 spam-related lawsuits against more than 100 companies and individuals, including one resulting in an award of $6.9 million from a Virginia-based spammer.
Not only does processing spam negatively affect productivity and increase IT costs, it often contains obscene images, financial scams, and malicious software that can damage a user's computer or an enterprise's network. A practice known as phishing is used by criminals to fake solicitations from online companies such as eBay and Citibank. These solicitations are sent as e-mails that are dressed up with logos and other formatting to look like an e-mail that could have been sent by the company that they are attempting to impersonate. The e-mails request personal information such as a credit card number or social security number. Brightmail, an e-mail protection vendor, indicated that 27 percent of the e-mails that they filtered in October 2003 were phishing e-mails.12
Malicious e-mails cause consumers to lose confidence in doing business online, which can affect every company with an online presence. It behooves all of us to support the antispam movement. Developers and researchers are working on solutions to the spam problem. As the perpetrators of spam become cleverer in their techniques for circumventing standard antispam solutions, software developers have become cleverer in their approach to antispam solutions. Several of these antispam solutions are discussed later in this chapter.
What Can Be Done to Fight Spam
The previous sections describe various aspects of spam and how it affects individuals, companies, and developers. Based on the enormous negative impact that spam has on our lives, we all bear a responsibility to do what we can to stop spam. The following sections look at ways in which each of us can help to fight spam.
Individuals
Individuals have the biggest opportunity to affect spam.13 It's individuals who are running the companies, marketing departments, and data centers that send out spam. Individuals are also the terminus for spam; meaning collectively we could use tools that can make spam a bad memory. The suggestions that I am providing here for individuals applies to consumers, employees, students, and other direct users of computers:
-
Use antispam software—ISPs often provide antispam tools as part of their service. Most e-mail applications come with antispam features. You can also obtain free tools from advocacy groups on the Internet. Turn on the antispam features of your applications. Use these features as part of your decision-making process for companies and products that you are researching. Client-side antispam software is discussed in the "Antispam Approaches" section.
-
Discourage spam—We all face situations where we could send on a chain e-mail, pass on e-mail-based ads, or choose a company that has a less-than-reputable reputation for delivering bulk e-mail. To quote Nancy Reagan, "Just say no!" It may seem cute, or harmless, or a way to make more money, but in the end it costs us all money in lost productivity and even lost jobs due to lower profit margins.
-
Validate attachments—Some spam can carry a piece of devious software that can cause spam and the software itself to be propagated to everyone on your contact list. Be certain of attachments before you open them, even if they come from someone you know. I even call my wife before opening an attachment from her, just in case!
-
Don't buy from spammers—Spammers who send advertisements only continue to do it because it's profitable. Whatever they are selling, you can get from someone else. Use Google.com to find alternative suppliers of anything you might find interesting in spam.
Companies
Companies can be seen as bearing the greatest burden when it comes to spam. Spam causes them to lose money and productivity. Spam clogs their networks. But their advertising campaigns are also the originators of spam, either directly or indirectly. Here are some suggestions for corporations to nip spam in the bud:
-
Use antispam software—Ensure that your e-mail servers use antispam software. Work with organizations such as Brightmail14 to deploy a spam-prevention solution for your company. Insist that your employees use antispam software on their desktops and at home. As an ISP, provide free antispam software to subscribers of your service. Both server-side and client-side antispam software is discussed in the "Antispam Approaches" section.
-
Have an anti-spam policy—Each company should have a policy that discourages sending spam as a marketing tool or doing business with distributors of spam. All of your customers and potential customers should have a way to opt out of e-mails from your company. These opt-out preferences should be honored by all of your employees and agents.
-
As an ISP, don't permit your members to use your resources to send spam. Use a challenge-response system to avoid the automatic creation of accounts for sending spam and other devious software.
-
Join the organized fight against spam—Join organizations to fight spam and to pass appropriate legislation for going after spammers.15 Be a visible advocate of spam prevention. It will show your employees that you are serious about your antispam stance and enhance your corporate brand with consumers.
Developers
Developers build applications, Web services, and line-of-business applications that could potentially send e-mails to the general public. Your software could also collect contact information from consumers that could later be used to send spam to them. You have a choice to protect people like yourself and your family who are recipients of spam by doing the following:
-
Discourage bad behavior—Many developers, including myself, run across people who are a bit extreme in their views about what constitutes fun. We are in a unique position to be part of the community of people who can create many of the applications that are reported in the news. As part of this community, we should discourage the creation of spam tools or devious software and their proliferation.
-
Write privacy-aware applications—When creating applications that can send or collect e-mail, we should add features that permit adherence to a user's privacy preferences. When creating Web sites that send e-mail to users, provide a means for users to opt out of any e-mails that your Web site might send.
-
Expand antispam research16—Several organizations are conducting antispam research. Typically, the work performed by researchers is rarely developed into products. It is important that product developers recognize the value in the research and incorporate it into their products. Work with research groups to see whether there is a new approach from which your product or service could benefit.
Antispam Approaches
This section looks at several approaches that have been taken to combat spam. Most of these are techniques that have been incorporated into tools and larger applications. The last two are approaches with which many of us could become more involved:
-
Accept list—This is a list of e-mail addresses or domains that are determined to be trusted. This list is built over time as the user determines which e-mails are spam and which ones are legitimate. The drawback to the approach is that spammers often use fake e-mail addresses to evade being identified by these lists. For example, I often get e-mails that have my e-mail address as the sender. This approach also requires constant interaction from the user.
-
Block list17—This is a list of e-mail addresses or domains that are determined to be responsible for sending spam. This list is built over time as the user determines which e-mails are spam and which ones are legitimate. The drawback to the approach is that spammers usually use fake e-mail addresses and domain names and often change them to evade being identified by these lists. This approach also requires constant interaction from the user.
-
Challenge-response—This technique sends an e-mail to the originator of an e-mail asking the originator to validate the e-mail by answering a question or typing in a sequence of numbers and letters displayed in an image that cannot be easily read by a computer. This method easily catches spam sent by automated systems where no one is monitoring received e-mails. Unfortunately, this can include legitimate automated response systems from which you may receive an e-mail as the result of an online purchase or a subscription to an online newsletter. This technique can also be an annoyance because e-mails are delayed by a request being sent to the originator asking for validation.
-
Keyword-search—This approach looks for certain words or a combination of words in the subject line or body of an e-mail. For example, an e-mail that promotes organ enlargements or Viagra would be considered spam. Using a keyword search to validate e-mails for children may be fine. However, many of the words in a keyword search could be part of legitimate e-mails. Moreover, many spammers use clever misspellings to get around these types of filters. Search rules are not case sensitive (so SEX, Sex, and sex as subject words would all be detected). Misspelling and punctuation in the middle of a spam word defeats keyword search spam detectors. Spammers also add additional white space or invisible characters between letters in a word to avoid these filters.
-
Hashing—With hashing, the contents of a known piece of spam is hashed and stored. Each received e-mail is then hashed and if the hash matches any of the stored hash values for spam, it is rejected. Although this technique is quite accurate at rejecting known spam, it requires additional computing power to process each e-mail, and it is not very effective against most spammers. Many spammers modify their e-mails by adding a random phrase at the beginning or end of an e-mail, which renders hashing useless.
-
Header analysis—Each e-mail that is sent across the Internet has a header associated with it that contains routing information. This routing information can be analyzed to determine whether it has the wrong format, because many spammers try to hide their tracks by placing invalid information in the header. For example, the from-host field of one line may not match the by-host field of a previous line. Although this may indicate spam, it could also indicate a misconfigured e-mail server. Equally, a well-formed header doesn't necessarily mean that an e-mail is not from a spammer.
-
Reverse DNS lookup—This approach validates the domain name of the originator of an e-mail by performing a Domain Name System (DNS) lookup using the IP address of the originator. The domain name that is returned from the lookup request is compared against the domain of the sender to see whether they match. If there is no match, this e-mail is considered spam. Although this can be effective in many cases, some companies do not have their DNS information set up properly, causing their e-mail to be interpreted as spam. This happens often enough to be a problem. That, combined with the performance hit for doing this, makes this solution less than optimum. To perform your own DNS lookup, go to http://remote.12dt.com/rns/.
-
Image processing—Many advertising e-mails contain images of products or pornographic material. These images usually have a link associated with them so the recipient of the e-mail can click it to obtain more information about the product or service being advertised. Images can also contain a Web bug used to validate an e-mail address. Blocking these images can protect children from harmful images. Some spam tools flag e-mails with images, especially if they are associated with a link, and block them from the inbox. Some sophisticated tools can perform a keyword search of images and reject an e-mail based on the results.
-
Heuristics—This technique looks at various properties of an e-mail to determine whether collectively enough evidence exists to suggest that a piece of e-mail is spam. Using this approach, several of the techniques previously mentioned, such as header analysis and reverse DNS lookup, are combined and a judgment made based on the results. Although this approach is more accurate than any of the approaches used individually, it is still not foolproof and requires a lot of tweaking to compensate for new evasion techniques that spammers deploy.
-
Bayesian filter18—This filtering technique is one of the cleverest and most effective means for combating spam.19 It is a self-learning mechanism that can continue to outwit spammers during its lifetime. It works by taking the top tokens from legitimate e-mails and spam e-mails and placing them in a weighted list. Tokens are words, numbers, and other data that might be found in an e-mail. Fifteen tokens are considered to be the optimum number of tokens to use. Too few tokens and you get false hits because the few tokens will exist in good and bad e-mail. Selecting too many tokens results in more tokens appearing in good and bad e-mail. 20
-
Suppose, for example, that you are a doctor. It may be common for you to receive e-mail with the words breast and Viagra in them. However, the words examination, patient, x-ray, and results should be more common for your legitimate e-mails than spam. These words would become tokens for the legitimate list, and spam-related tokens would go in the other list.
-
You can see how this technique would be more effective on the client than at the server. Deploying this at the server will result in a more generic set of tokens than tokens that are customized for the type of e-mail that each individual would receive. Looking at the previous example, the tokens for the doctor would probably not appear in the legitimate e-mail list because the majority of the e-mails being received by the e-mail server probably won't be for a doctor, or certainly not for the same type of doctor.
-
Payment at risk—This is an idea that was presented at the World Economic Forum in Davos.21 It would charge the sender of e-mail a small amount of money each time one of the sender's e-mails was rejected as spam. Although this may be worrisome for senders of legitimate bulk e-mail, it should not be a problem if they are using an opt-in model for determining who is sent e-mails.
-
Honeypots22—Some spammers use open relays on the Internet to send their spam on to its final destination, thus hiding their own identity. A honeypot is a service that simulates the services of an open relay to attract spammers and detect their identity. Deploying these can help fight spam, but could also make you a target. There have been cases where companies that deployed honeypots suffered denial-of-service attacks from spammers attempting to seek retribution. Operators of honeypots can also risk litigation by interfering with Internet communications.23 Funding one may be better.24
-
Legislation—Legislation such as the Controlling the Assault of Non-Solicited Pornography and Marketing (CAN-SPAM) Act25 has made great strides in stopping U.S.-based spammers from sending out spam. The European Union's E-Privacy Directive Proposal also seeks to stop spammers.26 Support of these types of legislation can do a lot for national spam control and will hopefully encourage other nations to pass similar laws.
Challenge-Response for Account Creation
Several ISPs, such as MSN, AOL, and Yahoo, have implemented challenge-response systems for the creation of new accounts to thwart spammers who use automated programs to create new e-mail accounts from which to send new spam. In typical challenge-response systems, the user is presented with a blurred image and asked to enter the characters displayed in it using the keyboard to complete the creation of a new account. This represents a major barrier to spammers who use automated account-creation systems. EarthLink has even extended this feature to force e-mail senders to respond to a challenge e-mail before their initial e-mail is delivered to the addressee.27
A variation of this idea proposes to send a response to each sender of an e-mail to force the sender to perform a simple operation that will use up the resources of the originating e-mail server. Although this is not of any consequence to a sender of a few e-mails, this would heavily impact a company that sends millions of e-mails.
Client-Side Antispam Solutions
Client-side e-mail solutions are features that come with an e-mail client such as Outlook, Netscape, or Eudora. ISPs such as MSN, Yahoo, and AOL also provide antispam features for their client software. These features usually consist of filters that check incoming e-mail and block it based on various criteria. Many of these filtering techniques were described in the previous section.
E-mails that are filtered may be placed into a spam folder, deleted-items folder, a specified folder, or just deleted. One of the problems with these filters is they can inadvertently filter out valid e-mails. Suppose, for example, that you have a filter that routes e-mails to a spam folder based on obscene words. After setting up the e-mail filter, you may receive an e-mail from your doctor about breast cancer. This e-mail could be filtered out of your inbox as spam. For this reason, some e-mail clients permit the user to flag e-mails that have been routed to a spam folder as legitimate e-mails. This flagging tells the filter utility to accept e-mails from specific e-mail addresses or domains. The utility remembers the user's selection and uses the information to filter successive e-mails that arrive at the client. However, this can be a bit tedious. Some more advanced filters automatically place the e-mail addresses of contacts and sent e-mails on the list of acceptable e-mails, relieving users of this burden.
Microsoft Outlook 2003 and MSN software both block images by default. Images that are embedded in e-mails may contain Web beacons that can be used by spammers to validate e-mail addresses. For users who have enabled the preview feature of their e-mail client, these Web beacons can be activated without reading the e-mail.
Peer-to-peer software such as Cloudmark permits users to mark e-mail as spam. Information about the marked e-mails goes to the other members in the peer-to-peer network to block the e-mails from other members' inboxes. This permits everyone in the peer-to-peer network to benefit from spam detection by any of the members.
The company Cobion28 makes Windows, Linux, and Solaris-based e-mail filtering software. Their Web filter software controls which Web sites employees can visit based on the employee's role, the Web site's address, and the Web site's content. Their e-mail filter can control e-mail entering or leaving an enterprise. The e-mail filter makes use of acceptance and rejection lists. They also filter on domain name, subject, body content, and the content of attachments. The software is also able to scan an image file to determine whether it contains restricted text.
Spam and Infected Attachments
Undesired attachments that often accompany e-mail are not considered spam. However, when they contain viruses, they can be more harmful than the spam that delivered it. One thing that makes malicious attachments insidious is the fact that they can come from people you know who were previously infected by the same software virus. Using an antivirus application such as the ones that are made by McAfee, Symantec, or Computer Associates can help protect your computer and data from harm. Following are some guidelines that can help protect you against viruses:
-
Don't open attachments from unknown e-mail addresses.
-
Validate that attachments sent by friends were actually sent by them.
-
Use antivirus software to scan e-mail attachments.
Server-Side Antispam Solutions
For enterprises and ISPs, the client-side filter does nothing to relieve the network traffic or reduce the resources needed to process e-mail. To positively impact a company's infrastructure costs, an antispam solution needs to stop spam before it enters the enterprise. This section looks at various types of solutions to help do this.
Block List Companies29
A block list is a list used to indicate e-mail addresses or domains from which you want to block e-mail. Companies have used their own lists for years to help determine which e-mails are spam. Block list companies such as Brightmail, Spews.com, and SpamCop make the process more efficient by combining lists from multiple companies. This is one of the easiest ways for companies to protect themselves from unwanted e-mails. The savings made from not having to process spam can easily compensate for the fee charged by these companies.
Antispam Server Software
Some companies sell software that is run on a server between the Internet and the company's e-mail server. The purpose of this software is to remove the burden of filtering e-mail from the e-mail server. This type of software can relieve companies of the expense of having to create and manage their own solution. In an effort to benefit from their investment in antispam software, for example, Boeing is commercializing its internal solution, which it is calling MessageGate Security Edition.30
IronPort not only creates systems to permit companies to send bulk e-mail, they also sell servers that enable companies to filter spam.
In addition, two solutions—Spam Sleuth and SpamSquelcher—take a slightly different approach to the way that they protect companies from spam.
Enterprise from Blue Squirrel provides a solution that blocks spam from reaching a company's e-mail server. This product enables administrators to configure the many filtering options while enabling users to personalize their settings through a client application. The following list identifies some of the product's many features:
-
Works with any e-mail server
-
Challenge-response to force senders to validate their e-mail at a Web site
-
Permits domain-level rejection or acceptance lists
-
Replies to spam transmissions as undeliverable
-
Validates senders by using the following criteria:
-
Checks for missing reply address
-
Validates that from address is equivalent to reply address
-
Compares the IP and DNS data against rejection lists
-
Checks subject and body text against blocked words
The product SpamSquelcher is marketed by ePrivacy Group. This product is unique in that it does not block any e-mails from reaching your company. What it does is increase the processing time for delivering spam for companies sending spam. In this manner, legitimate e-mail is not accidentally lost because of an overly sensitive filter. Decreasing the delivery bandwidth for spam has the effect of increasing the bandwidth for legitimate e-mail while increasing the costs of spammers who send e-mail to companies that deploy this technology.
Developing E-Mail-Friendly Solutions
Many companies and developers are building solutions that include a feature for sending newsletters, service updates, or marketing literature. When doing so, only collect the minimum amount of information needed to provide this service. Provide a way for your customers to opt out of these mailings. If you are bothered by the volume of e-mail that you receive on a daily basis, you can understand that customers want an easy way to manage their own e-mail. Your solution should include a way for users to manage their e-mail settings during the install process, while using the solution, and by going to your Web site.
If you provide a purely online service to customers, you should permit visitors to your site to decide whether they want to receive e-mails, including confirmation e-mails. Don't assume that your customers want to receive these e-mails. Enabling customers to look up a confirmation to an online transaction is a better long-term approach. Provide a means for customers to easily modify their e-mail settings in case they want to remove themselves from an e-mail list. Look at providing options that control how frequently customers receive e-mails. For example, consumers may only want to know about travel specials around holidays instead of every week.
Make sure that your policies on bulk e-mail are followed by agents to whom you outsource the distribution of e-mail. In addition, when you share e-mail lists with partners (with the consent of your customers only), be sure that they follow your e-mail policies.
If your company sends out bulk e-mails, be sure to register with block list companies to avoid having your e-mails flagged as spam. Although you may have a legitimate reason to send out thousands of e-mails at a time, there is no easy way for a recipient to distinguish these e-mails from spam unless you make an effort to inform the intended recipients ahead of time. Any cost associated with doing this should be offset by an increased delivery rate of your e-mails.
Protecting Legitimate Bulk E-Mail
Often companies send newsletters, monthly statements, airline specials, and security alerts using bulk e-mail to consumers who have subscribed to receive these mailings. Unfortunately, many of these mailings are blocked by spam filters and rejection lists. This has led to lost revenue, litigation, and the inconvenience of consumers who rely on the mailings.
Companies such as ePrivacy Group are creating solutions that block spam while permitting legitimate bulk e-mails to make it to their destination. ePrivacy's Trusted Sender Program requires that bulk e-mail companies register with them and adhere to certain practices in order to be accepted into the program. Subscribers to the service are able to add a trust stamp to their e-mail, informing users and e-mail servers that the e-mail can be trusted.
Bonded Sender is a similar program that is run by IronPort. Their program requires participants to pay a bond and agree to send e-mail only to users who have requested e-mail. Participants are added to an e-mail acceptance list. Companies that violate the agreement are placed on an e-mail rejection list and forfeit their bond.
Project Lumos, which is run by the E-mail Service Provider Coalition (ESPC), is an e-mail registry and authentication system that will help distinguish between valid and rogue bulk mailers. The 30 members of the ESPC represent more than 200,000 commercial marketing clients. Its success requires participation from ISPs.31
Participating in programs such as these will help lower costs and ensure the delivery of legitimate e-mail.
The SpamCon Foundation has gone a step further than simple participation; they are helping to fund companies running e-mail validation lists that are defendants in lawsuits. Spews.com, which was being sued by a group of spammers, was SpamCon's first client. A Florida judge eventually vindicated Spews.com's antispam tactics and dismissed the suit.32
Conclusion
For many companies and individuals, spam is an annoyance and undesired expense. Many products and services are available to help avoid spam. Only by using these tools can we help to stem the tide of the ever-increasing unsolicited e-mails that reach our inboxes every day. If companies with which you do business send you spam, make them stop. Support programs such as the Trusted Sender Program and efforts from companies such as the SpamCon Foundation to assist antispammers.
If you are a solution provider or developer, create e-mail-friendly solutions. Make sure you give customers an easy way to manage e-mails from you. Register with companies that may mistakenly tag your e-mails as spam.
References
Spam.abuse.net is the best site on the Internet dedicated to fighting spam. It contains a wealth of content, tips, and links to help you and your organization fight spam. Help for consumers can be found at http://spam.abuse.net/userhelp/. Help for IT administrators can be found at http://spam.abuse.net/adminhelp/.
Stopspam.org is another site dedicated to stopping spam and other abuses of the Internet. They provide similar tools and content to help consumers and companies fight spam. This site provides information in other languages, such as Hungarian, and they are always looking for volunteers to translate their content into other languages.
Spamresearchcenter.com is a Web site that is dedicated to creating free antispam software for the general public.
Footnotes
1. What is spam? Visit http://spam.abuse.net/overview/whatisspam.shtml and http://www.templetons.com/brad/spamterm.html for their answers.
2. http://www.bizjournals.com/pacific/stories/2002/06/10/daily22.html
3. http://www.ironworks.com/comedy/python/spam.htm
4. http://www.british-legends.com/
5. This was written during the case Olmstead v. United States, http://caselaw.lp.findlaw.com/scripts/getcase.pl?court=US&navby=case&vol=277&invol=438&friend=oyez
6. Many organizations have defined unwanted e-mail as a type of communication privacy (http://www.caslon.com.au/privacyguide1.htm, http://www.privacyinternational.org/survey/Overview.html).
7. Stefan Brands, PET Workshop, Brussels, Belgium, July 2003
8. IETF Anti-Spam Research Group
9. Kris Oser, "Live from FTC Forum: What Spam Costs," Direct Newsline, May 1, 2003.
10. Tim Lemke, "Spam Harmed Economy More Than Hackers, Viruses," The Washington Times, November 10, 2003.
11. "EarthLink Wins Antispam Injunction," Associated Press, May 7, 2003.
12. David Strom, "'Phishing' Identity Theft Is Gaining Popularity," Security Pipeline, November 20, 2003.
13. The Sarasota PC User's Group also has a great list of 2004 New Year's resolutions, http://www.davebytes.com/db010504.htm.
14. Brightmail, Inc. is the award-winning creator of enterprise-level antispam software, http://www.brightmail.com/.
15. "Yahoo, Microsoft, AOL Sue Under New Anti-Spam Law," Bloomberg News, March 10, 2004.
16. The Anti-Spam Research Group is the best place to get connected with researchers, http://asrg.sp.am/.
17. A directory of sites that provide block lists can be found at http://www.spam-blockers.com/SPAM-blacklists.htm. Although the terms whitelist and blacklist are used to discuss lists used in spam control, many people find the terms inappropriate, so I don't use them. For Carla.
18. CRM114, the Controllable Regex Mutilator, is considered one of the best Bayesian filter algorithms, http://crm114.sourceforge.net/.
19. One researcher found a way to defeat this type of filter. However, the effort involved is basically cost-prohibitive, http://news.bbc.co.uk/1/hi/technology/3458457.stm.
20. K9 is a software filter that works with POP3 mail servers that implement a Bayesian filter and it is absolutely free, http://www.keir.net/k9.html.
21. http://news.bbc.co.uk/1/hi/business/3426367.stm
22. http://www.honeypots.com/about.html
23. Kevin Poulsen, "Use a Honeypot, Go to Prison?," SecurityFocus, April 16, 2003, http://www.securityfocus.com/news/4004.
24. Steven J. Vaughan-Nichols, "Stopping Spam Before the Gateway: Honeypots," eSecurityPlanet.com, November 13, 2003, http://www.esecurityplanet.com/trends/article.php/11164_3108311_2.
25. http://www.spamlaws.com/federal/108s877enrolled.pdf
26. The European Coalition Against Unsolicited Commercial Email, http://www.euro.cauce.org/en/index.html.
27. Jonathan Krim, "EarthLink to Offer Anti-Spam E-Mail System," Washington Post, May 7, 2003.
28. Cobion was recently acquired by Internet Security Systems, http://www.iss.net/.
29. A selection of block list companies is at http://www.spam-blockers.com/SPAM-blacklists.htm.
30. Matt Hines, "Boeing's Antispam Spinoff Takes Flight," CNET News.com, August 21, 2003.
31. Stefanie Olsen, "Marketers Unite to Cook Spam's Goose," CNET News.com, April 23, 2003.
32. Daniel Tynan, "Antispam Activists Win (and Lose) in Court," PCWorld.com, October 14, 2003.
10:17:00 PM
SoftQuad's XMetaL takes a good first cut at a workable interface for writers (as opposed to programmers or data-entry clerks) working with structured text. It's more than an "XML editor", a label that might be applied to products like XED, XML Spy, and Vervet that provide basic data and metadata editing functions with explicit control over XML markup. XMetaL falls into new category that you might call XML or structured word processing along with Arbortext's Adept Editor and Word Perfect SGML. XMetaL is available for Windows platforms at $495 per user. XMetaL is relatively inexpensive, relatively easy to set up, and relatively easy to use as a word processing tool for writers who need to produce valid documents according to established formulas. The target market for SoftQuad's XMetaL includes the traditional market for SGML editors, tech doc and integrated vertical applications. However, it should make it easier to deploy a structured editor to an off-site writer who may have little or no training in XML. Another target is editorial groups in which Microsoft Word is producing copy that will eventually be converted to XML and will need to stand up to XML validation. This includes Web sites such as the Wall Street Journal Interactive Edition, where writers use a customized version of Word to produce RTF files that are converted to XML, validated, and then fed into the production system or sent back to the author for revision. So the goal for XMetaL was to be a word processing tool for structured documents that is as easy to use as Word when customized for an individual DTD. SoftQuad, Adobe and Arbortext all have experience customizing an interface for a specific environment. Most of the successful, SGML-authoring projects utilize a dedicated editor that conforms to its document type and work requirements. In XMetaL, SoftQuad has tried to produce a tool that can be set up in two weeks by anyone with general scripting skills instead of two months by an XML consultant.
![]()
Find out more about XMetaL in our product guide. Have you used XMetaL? Share your opinion with us.
ReadMore...
10:09:00 PM
Eric van der Vlist is the author of XML Schema.Microsoft Office Embraces XMLFor many participants, the most memorable event of XML 2002 will be JeanPaoli’s presentation of Office 11, which promises to deliver easier access toXML for hundreds of millions of workstations.Those of us who had to connect a Windows PC to the Internet in theearly 90s remember the difficulty of choosing and installing TCP/IP andthe browser software necessary to access and browse the Web. At that time,Microsoft didn’t be For many participants, the most memorable event of XML 2002 will be Jean Paoli's presentation of Office 11, which promises to deliver easier access to XML for hundreds of millions of workstations. Those of us who had to connect a Windows PC to the Internet in the early 90s remember the difficulty of choosing and installing TCP/IP and the browser software necessary to access and browse the Web. At that time, Microsoft didn't believe in the future of the Internet, TCP/IP wasn't natively supported by Windows, Internet Explorer was a vague project in a laboratory, and many companies had developed market segments left uncovered by Microsoft. This era was wiped away by a U-turn, which I have always considered a miracle from a company of the size of Microsoft. Within months, it bundled a TCP/IP stack and Internet Explorer with Windows. Internet features have been rapidly added to Office. Users applauded. Companies positioned on these segments either changed their strategy or disappeared, which is believed to have decreased the overall possibility for innovation in some domains. XML was already well-supported by Microsoft BackOffice products from Biztalk to CMS through XML Server, but a key piece was missing: tools to let users manipulate XML on their workstations. The issue of editing XML documents is still as difficult as the connection to the Internet in the early 90s: technically there is a solution and many XML editors are available, but the financial, institutional, and human impact of deploying these tools on a large scale is considered a major obstacle by many organizations. "XML for the masses" is the target of Office 11, and Paoli's presentation suggested that Microsoft will likely meet the target. Without major innovations (except maybe the linking of XML documents to Excel spreadsheets using XPointer references), Office 11 appears to xmlizing Office using largely standard technologies and enabling the manipulation of arbitrary XML documents using customer-chosen schemas: Word 11 has been transformed into a XML editor and can be used to edit any XML document, assuming you can write a W3C XML Schema for it. The presentation can be configured and validation is done on the fly like spell-checking. A standard XML format has also been added for ordinary Word documents. Excel XP already exports documents as XML. Excel 11 adds support for arbitrary documents and, maybe more interesting, the possibility to import values from XML documents as with a DBMS. The selection of the values to import is done through drag and drop; the links are stored as XPointer expressions. XDocs is a new application that defines and uses document-oriented forms, more similar to the forms in Lotus Notes than those on the Web. User input may be stored together with the form in a XML document using a schema defined by Microsoft or in external XML documents with arbitrary schemas. Access 11 can export its content as XML using a user-supplied schema. Visio has its own XML format and can also read arbitrary XML documents and display their content in its drawings. Visio is the first Microsoft application to support SVG; it can load and save SVG documents. Front Page 11 includes a WYSIWYG XSLT editor to define XSLT transformations through drag and drop. Powerpoint is the only piece without an XML update because, according to Paoli, of the lack of time. For the rest of the applications, XML can be used as a channel of information between front and back office applications, but also between front office applications, creating a lot of new possibilities for users, consultants, and integrators who will be able to exploit them. "XML for the masses", the target of Microsoft, is not the same as the target of the XML editors we know today, and it will probably take some time for Word to become a serious challenger. Nevertheless, many will be tempted to use a tool which is installed on so many workstations. The effect of this may well be to reduce the opportunity for competition, innovation, and value-add in the existing XML editor world, yet also to create new market segments. Often criticized for its "embrace and extend" strategy, Microsoft has finally decided to continue to play the game with XML, even though the extensibility of XML opens new and unpredictable possibilities. But Microsoft needs to control all the major market segments in fear that XML might give to the masses the possibility of emancipation from its domination. While the deployment of XML on millions of workstations is good news in the short term, it will certainly modify the landscape of desktop XML. The shape of this new landscape, and the longer-term consequences, are difficult to foresee. Jean Paoli for Microsoft and Daniel Vogelheim for OpenOffice both chose the same title "XML for the masses" for their presentations, a commonality which hides two very different approaches from the editors of two competing office productivity suites. The strategy of OpenOffice is to focus on the XML format natively used to store the documents. In his presentation Daniel Vogelheim gave an overview of the OpenOffice XML format and justified the design decisions taken to meet the following requirements: The result is a complex format (over 450 elements and more than 1600 attributes), with a good amount of redundancy, but easily readable and easily transformable. To some extent it's an XML format for users more than for developers. This format has been given as an input to the OpenOffice OASIS Technical Committee, which aims to create an "open, XML-based file format specification for office applications." For Microsoft, the strategy appears to be to bring XML tools to each desktop, and leave each user free to choose appropriate schemas, rather than promoting an XML office format which will be specific to Microsoft, and for which a licensing model is still unclear. If the target of Microsoft Office 11 is to deliver XML tools to the masses, the target of OpenOffice is to become the XML office format for the masses. Document Schema Definition Languages (DSDL) is a project of the ISO/IEC JTC 1/SC34/WG1 working group chaired by Charles Goldfarb. After the meetings held in Baltimore during XML 2002, this working group has published a set of recommendations which have been all approved: DSDL has also advanced the definition of the remaining parts, and several of them should lead to publications during the next meeting at XML Europe 2003. Among the decisions taken on part 1 (Interoperability Framework), are as follows: The Interoperability Framework should allow one to use existing languages without modifications and thus to manipulate full documents instead of fragments. This approach will follow the principles of the Schemachine proposal by Rick Jelliffe, but it will be made more declarative and less procedural. My own XVIF proposal is considered interesting and an extension mechanism will be added to Relax NG to support it in a more standard way. Further reading on DSDL and XVIF: For different reasons many XML 2002 presentations proposed the use of multiple validations and transformations for advanced needs, rather than using a single schema considered too complex or even impossible to write and maintain. Perhaps influenced by my editorship of "DSDL part 1 -- Interoperability Framework", I observed the justification of such a framework returning as a leitmotif in many presentations: Liora Alschuler, in her presentation " Layered Constraints: The Proposal for HL7 Healthcare Templates," explained why, in face of the huge diversity of the practices for health reports, HL7 has chosen to associate a very lax generic schema together with templates, i.e. specific constraints which formalize the different local usages of the common schema. Walter Hamscher in " XBRL: XML, XLink, and the Revolution in Corporate Reporting" explained why, for similar reasons, XBRL has chosen to express most of the structure of its reports as extended XLink link bases. Since these links cannot be validated using W3C XML Schema, to be complete the validation of XBRL documents requires a validation by the application layer that could also be performed using a language such as Schematron. Gabe Beged-Dov in " Normalized Metadata Format: RDF Meets XML Schema" showed how RDF documents may be "normalized" to facilitate their validation through W3C XML Schema. Eric Freese in " Using DAML+OIL as a Constraint Language for Topic Maps" proposed a modification of the syntax of XTM Topic Maps documents (which could be done by a XSLT transformation) that enables their validation using RDF applications such as OWL or DAML+OIL. Bob DuCharme in " Maintaining Schemas for Pipelined Stages" has shown that the customization of generic W3C XML Schema or Relax NG schemas with added metadata could be performed through XSLT transformations more easily than using the derivation techniques of these languages. There are few commonalities between these presentations, but all of them show how, confronted with the issue of a complex validation in very different domains, projects have chosen to split the validation of their documents into different, easier to write, elementary steps. That's also the approach taken by DSDL, the reason why it will be a multi-part standard, and the justification of its part 1, Interoperability Framework, which will define a language to describe the choreography of the elementary steps needed to perform a complex validation. The fact that the translation of Relax NG schemas into W3C XML Schema was considered impossible wasn't a good enough reason for James Clark, who presented at XML 2002 the latest progress of Trang, his multi-format schema converter. While it is not possible to transform any Relax NG schema into W3C XML Schema, Clark considered that in most of the cases a converter smart enough to figure out the intent of the author should be able to write a readable W3C XML schema. This would be as good as a schema written directly using W3C XML Schema and a good approximation of the Relax NG original schema. Clark's presentation showed that this goal is not far from being met. To achieve his aim, Clark had to make abstraction of the syntaxes beyond the two schema languages and to define a data model which is intermediate between Relax NG and W3C XML Schema. The translation is done in two steps: the Relax NG schema is parsed and feeds the data model, and criteria are applied to this data model to decide which W3C XML Schema should be used to get the best results both in term of approximation and readability. The results from the examples presented by Clark is outstanding, and he has acknowledged that writing Trang was much more complex than writing a Relax NG implementation. There appears to be quite a demand behind this tool too, as many developers are attracted by the simplicity of Relax NG, while they need to publish WXS schemas to be used by an increasing number of tools (Office 11 will require WXS schemas). Clark's answer to this request is simple: "don't bother with W3C XML Schema, write your schemas with Relax NG and use Trang to convert them." Norm Walsh presented at XML 2002 his implementation ( XWEB) of Literate Programming in XML, available as part of his DocBook stylesheets, which enables the extraction of both documentation and code from common documents. Introduced in 1984 by the father of TeX, Donald Knuth, Literate Programming is a software development methodology that focuses on documentation by embedding the source code in the documentation. Michael Sperberg-McQueen has proposed its application to SGML back in 1993. Its principle is to document code fragments (classes, methods, variables or XSLT templates are examples of code fragments), to include the code fragments in their documentation, and to link them into a "web". This web can then be transformed to produce, on one hand, readable documentation in any format and, on the other, the source code. The XML implementation presented by Walsh is thus based on mature concepts, and its current version was published in March 2002. It supports not only embedding traditional languages such as Perl or Java but also XML languages such as XSLT, schemas, or any other XML "code". Support for languages such as Python would probably require some adaptation since XWEB doesn't appear to care much about indentation. Literate Programming isn't incompatible with other methodologies such as Extreme Programming; among the extensions which seem most interesting, one could probably easily add the definition of the unit tests within the documentation of the code fragments. Purists will also note that, following tradition, XWEB is implemented through XWEB documents, a minimal XSLT transformation being provided to "bootstrap" these documents into usable pieces of code, which consist mostly of XSLT transformations.Microsoft Office Embraces XML
 The impression given in the presentation by Jean Paoli, co-editor of the XML 1.0 recommendation and pilot of the "XMLization" of Office, is that Microsoft is doing with XML what it did with the Internet.
OpenOffice: the XML format for the masses
ISO DSDL on the move
A burst of schemas
Impossible, Except For James Clark
Literate Programming in XML
ReadMore...

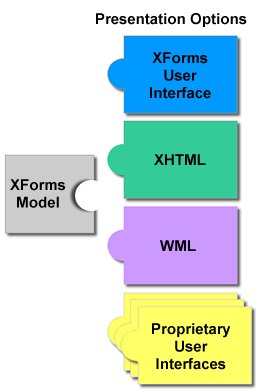