

2:07:00 PM
 Create animated light streaks using special Photoshop techniques.
Step 1
Open an image to edit. Use the Image Size tool to resize the image to the final output size you would like. This Photoshop effect will use a lot of your computers resource so we recommend starting off with a small image, around 300 pixels wide or tall.

Step 2
Duplicate the layer (Layer> Duplicate Layer or Ctrl+J).

Step 3
With the top layer selected, open the Levels tool (Image> Adjustments> Levels or Ctrl+L) and move the middle input slider all the way to the very right. Click OK when done.

Step 4
The light streaks will be created from the light areas in this layer. Use the Brush tool (B) and paint over the areas that you do not want any streaks to be generated from. If there are any light sources that's clipped off by the edge of the image, erase those light sources. If they're not removed, the final result will show light streaks with clipped edges.

Step 5
Change the blending mode to Screen.

Creating the Light Streaks
Now that we have the light sources identify, we can use it to create the light streaks. The streaks will be created by duplicating the layer and moving it one pixel at a time. This might send shivers down your spine; don't worry, it'll be easy and fun. Really!
Step 6
Before we start, we need determine the opacity of the light streaks. Light streaks with a lower opacity setting will be more transparent and is ideal if you'll be creating very long light streaks. If you'll be creating small light streaks, you can use a higher opacity. Instead of guessing, we'll give it a test. Change the opacity of the top layer to 15% and while holding the Alt key, press the right arrow key about 20 times until a streak of light is created. Using the reference below, adjust the opacity to what you think will work best with your image.

Step 7
Delete all the layers that were created so that you have 2 layers remaining. With Photoshop CS2, you can do this easily by selecting the layers the same way you select multiple files (Using the Ctrl or Shift key) and pressing the delete key.

Step 8
You've probably already figured out how to create the light streaks by now. But before I let you experiment, i need you to download a set of Photoshop actions that will let you zoom in/out and rotate left/right. Download and save the controls action to your computer then load it into Photoshop:
Loading the Action
- Open the Actions pallet (Window> Actions).
- Click on the flyout menu located on the top right of the Actions pallet and select "Load Actions".
- Locate and select the action file then click Load.
- The Controls action set should now be visible in your Actions pallet. There should be F keys assigned for each action. If you don't see any F keys assigned, it probably means that you have those keys reserved for other actions. To assign a different key to run the action, select the action, click on the flyout menu, select Action Options and change the Function Key.

The function key is shown beside the action name.
Step 9
Use the images below as a reference to controlling the light streaks.
Tip: This is a CPU & RAM intensive process so we recommend closing any unnecessary programs before proceeding.

Use these commands to control the direction of the light streaks.

Use these commands to control the zoom and rotation of the light streaks.

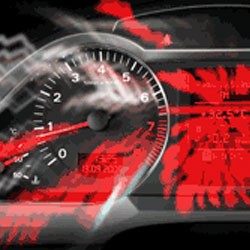
This is an animated sequence of the light streaks I created.
Animating the Light Streaks: Creating the Frames
To create the animation, we need to create the individual frames as layers.
Step 10
First, we need to determine the amount of frames we want in the animation. More frames will create a smoother and longer animation but will also take longer to complete and create a larger file size. For this tutorial, I will be creating an animation with around 10 frames. Because my animation will only have 10 frames, I can merge the 115 layers into 10 layers.

Step 11
With some simple math, we'll find out how many layers we need to convert to one. To do this, take the number of layers the light streaks was created with and divide it by the number of frames. For myself, this will be around 12 layers (115 layers ÷ 10 frames). Now select the top layer and press Ctrl+E to merge down with the answer to the mathematical equation as the number of times. For myself, I will press Ctrl+E twelve times to convert twelve layers into one. Select the layer below and do the same thing until all the layers have been merged

Step 12
Hide all the layers except for the bottom two layers.

Step 13
Select the second layer and press Shift+Ctrl+Alt+E to create a new layer from the visible image. Select/activate the layer above, click on the eye to make it visible, and press Shift+Ctrl+Alt+E. Repeat this for the rest of the layers above.

Step 14
Delete all the old layers except for Background.

Animating the Light Streaks: Animating with ImageReady
Now that we have the frames created, we're ready to switch to ImageReady to start the animating process.
Step 15
Send the document to ImageReay (File> Edit in ImageReady or Shift+Ctrl+M).
![]()
You may also press the Photoshop to ImageReady button in the toolbox.
Step 16
Open the Animation pallet (Window> Animation). Click the flyout menu on the top right corner and select "Make Frames From Layers". Your animation pallet should now contain frames created from the layers.

Step 17
Save the image. To save the image as an animated GIF file, change the Format in the Optimize pallet (Window> Optimize) to GIF and adjust the settings. Because the animation I created will be used on the web, I used the following properties:
Format: GIF
Colors: 64
Dither Method: None
Use the "Save Optimize As" tool (File> Save Optimized As) to save the image.
Final Results
There are countless effects that can be created with this technique. Experiment with different combination to discover new exposure blur animations.


Post a Comment