

10:51:00 AM
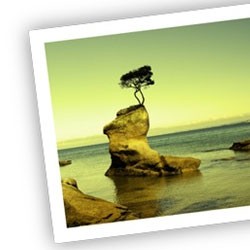 Scripting in Photoshop is something rarely touched upon in regular Photoshop tutorials, but is something definitely worth learning. Scripts are a much more powerful way to automate tasks than actions and can be used to do things which normally aren't possible in Photoshop. Here we create a script which will edit any image, giving a stylish way to show your photographs.
Introduction:
In this tutorial I will aim to show how to create this effect using scripts but will also show the corresponding steps in Photoshop, making it easy for you to understand how to alter your script to achieve different results.
Photoshop allows scripts in three different programming languages; VBScript, AppleScript and JavaScript, however JavaScript is the only cross platform script available so we will use it, it is also more useful to learn JavaScript. If you haven't ever programmed in JavaScript, you should still be able to understand this tutorial as I have explained all of the concepts in enough detail. When writing JavaScript you are free to use whatever text editor which suits you, however newer versions of Photoshop come with a program called ExtendScript Toolkit (ESTK) which makes scripting a lot easier. This is usually found hidden away in the same folder that contains Photoshop. If you don’t already have this program then you can download it here although it may not work for older versions of Photoshop. There are a few advantages of using this program, mainly the debugger and the fact that you can run scripts straight from the program.
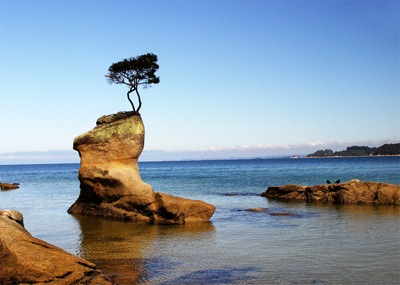
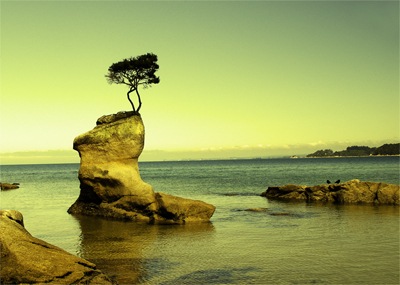
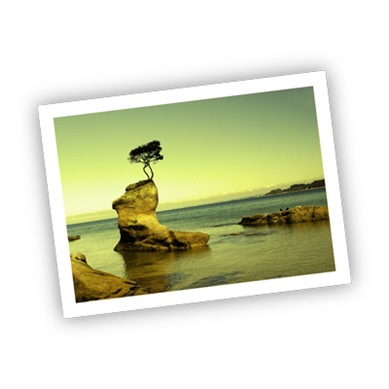
For most of the steps I will show what your image should look like after you have run the script. Throughout this tutorial I used this image from stock.xchng, optionally you can save a small size version of this image for the purpose of testing your scripts as the script will run faster this way. The script works for any image of any size.
Step 1
Open the editor you want to use, either ESTK or a regular text editor like notepad for Windows
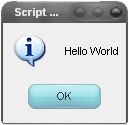
Now we will right a simple script to test we have the settings correct. Type the code shown below into your editor:
alert("Hello World") What this simple command will do is to bring up an alert box saying ‘Hello World’; we will use alert boxes throughout this tutorial in order to test parts of our script. By putting the quote marks in we are indicating that this is a string which is just a word.
Now run your script, If you are using a regular text editor like notepad then the easiest way to run your script is to save the file as ‘myscript.jsx’ then open Photoshop and go file>scripts>browse then select your script. If you are using ESTK then just hit the play button in the top right of the document window. Automatically you should see your alert box pop up. Before testing your scripts close any document that is open in Photoshop.
Step 2
Delete the alert code you had in the editor as we were only using it to test the settings. There are two settings we want to apply every time we run our script, these are to tell Photoshop to use pixels as the default unit and not to display dialog boxes unless we tell it to. If we wanted to do this within Photoshop we would go edit>preferences>units & rulers and change the rulers value to pixels, obviously turning off dialog boxes is limited to the scripting only. The code for doing this is:
preferences.rulerUnits = Units.PIXELS;
displayDialogs = DialogModes.NO
The first command is, simply telling Photoshop to access the rulerUnits within the preferences then change the units to pixels. You will notice that this is arranged in a hierarchical structure for example the rulerUnits is contained within the preferences, this is easy to visualise as Photoshop is arranged in exactly the same way.
The second command is basically telling Photoshop to change the value of displayDialogs to NO, if you wanted to have dialogs displayed while running the script then you would change the NO to YES.
Step 3:
Now we want to let the user select a file to open, for this we need to bring up an open dialog box, even though we turned dialogs off if we tell Photoshop to bring up a dialog it will do it. We then want to define a variable that references to this document then we want to duplicate the background layer. The code for doing this is:
open(File(openDialog()));
var docRef_1 = activeDocument
docRef_1.backgroundLayer.duplicate();
The first command is made up of three parts, the open() command which will open the file within the brackets, next the File() command which fetches the file path within the brackets but instead of adding a path we added the openDialog() command. So this is displaying a dialog box where the user selects a file then it will get the file path and open that file, if you were wanting to open the same file each time you could swap the openDialog() with the file path and name .
In the next command what we are doing is setting up a variable using var then the variable name which can be anything but here I used docRef_1, if I was to open another document I would make a variable named docRef_2. We are then setting docRef_1 to be equal to the active document.
In the last command what we are doing is telling Photoshop to duplicate the background layer in docRef_1 which is the only document we have open anyway. You will notice again that this is similar to what you would do in Photoshop, as in you would select the document which contains the layer you want to duplicate then you would select the layer you want to duplicate then you would duplicate it.
Try running the full script now and you will end up with a background layer containing the image you chose and also a layer above that containing the same image.
To do this step in Photoshop you would simply go Ctrl+O then choose your file then right click on the background layer and select duplicate layer.
Step 4:
Now I will show you how to define colors using hexadecimal codes, colors can be defined in other ways like by RGB values as we will see later. Here we will define a white color and a black color then set black as the foreground and white as the background. There is other ways of doing this but for the purpose of this tutorial I will show you this way. The code for this step is:
var white = new SolidColor();
white.rgb["hexValue"] = "ffffff"
var black = new SolidColor();
black.rgb["hexValue"] = "000000"
foregroundColor = black;
backgroundColor = white;
You will notice here that the first two lines are roughly the same as the second and third; what we are doing here is setting up a variable which can be named anything but here we use the color it will contain as the variable name. We are then saying that this variable is equal to new SolidColor() which is a function for creating a new color. The next line is setting the hexadecimal value for this color to whatever the color should be so for white this is "ffffff", what we are ultimately saying here is that white is the color white and black is the color black.
The last two lines set the foreground color to black and the background color to white, and are fairly easy to look at and understand straight away. In Photoshop the equivalent action for doing this would just be to hit D to reset the colors.
Try now, setting the foreground color and background color to a random color manually then running the full script which should give you the same result as we got in step 3 but now the foreground and background colors will be set properly.
Step 5:
Now we are going to fill the background layer white using the white color we set up in the last step. For this we first need to make a selection around the whole document then fill that selection. The code for this is:
docRef_1.selection.selectAll();
docRef_1.selection.fill(white);
docRef_1.selection.deselect();
The first line creates a selection using the selectAll() function, for any command that can be used on different documents we have to tell Photoshop which document we are working on even though we only have one open in this case.
The second line is telling Photoshop to fill this selection in with the white color. Sometimes it is confusing as it wouldn't be stupid to think that something like docRef_1.selction.fill = white would do what we are trying to do, but this isn't a real command and this is where ESTK comes in useful as it will point out the correct use of something like the fill command just by typing in fill.
The third line is fairly self explanatory, it will deselect the selection, exactly the same as hitting Ctrl+D in Photoshop.
Again test the script and you should end up with a white background layer and the image in the layer above. In Photoshop, all this could have been done using Ctrl+A then Shift+F5 to select all then fill the selection.
Step 6:
In the next two steps we will use a script to find the average color in the photograph; we will then use this information to decide how to edit the image. This part of the script could have lots of other uses for example you could use a similar script to create a color chart based on the colors that make up the image. In this step we will first duplicate the image layer then we will apply an average blur filter which will find the average color then fill the layer with that color. The code for doing this is:
docRef_1.layers[0].duplicate();
docRef_1.activeLayer = docRef_1.layers[0];
docRef_1.activeLayer.applyAverage();
The first line looks familiar, we used the same command in step 3 but here we have replaced backgroundLayer with layers[0]. To understand this we need to know a bit about arrays in JavaScript. Arrays are simply just variables which hold more than one value, where variables are like boxes with a single piece of information, arrays are like a big boxes with lots of smaller boxes labelled zero to infinity inside. For example if you wanted to create an array holding the first three days of the week you would type:
var days = ["Monday", "Tuesday", "Wednesday"]
Now if you wanted to use the first day of the week you would use the code:
days[0]
This would equal "Monday"
Obviously don't include these last two lines in your script. Now that you know a bit about arrays we can go back to the three lines of code we added. In the first line layers is an array which includes all the layers in our document. The top layer in the stack is always the first in the array, corresponding to layers[0] because arrays start at 0 instead of 1.
The second line sets the active layer to the top layer this is the same as selecting a layer in the layer panel in Photoshop. We didn't need to change the active layer but it makes things easier later on.
The last line applies the average blur, the format here is the same as most of the commands we have used so far and is what's called a method and usually takes the form of document.layer.function where the layer is the active layer and the function is applying the average blur. This can be done in Photoshop by going filter>blur>average.
Again, test the script and you should have a new layer above the image filled with a solid color.

Step 7:
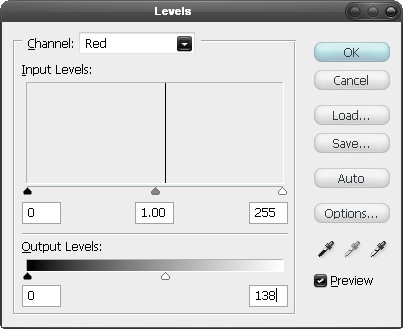
This step is slightly more complicated, what we want to do is find the RGB values of the color we have in this layer. There is no really simple way of doing this in a script but the method I use is to have the script select first the red channel then get the histogram of that channel then go through the histogram from 0 to 255 until it finds a value that isn't zero then that value will be the R value, it then repeats that for the green and blue channels. It is easier to explain this by going through this process in Photoshop. If you don't still have the document open from when you tested it in the last step then run your script again. Okay go to the channels by going window>channels and select the red channel this should now hide all the other channels and the image will look grayscale. Next hit Ctrl+L to go to the levels adjustments, you will see a histogram with one vertical line in it, now drag one of the output levels sliders to roughly below the line and the number in the corresponding box is the R value. Getting the G and B value is done in the same way. The script to do this for the R value is shown below, from this you should be able to work out the code for the G and B value.
for (RLevel = 0; RLevel <= 255; RLevel ++) { if (docRef_1.channels["Red"].histogram[RLevel]) { break; } } This block of code is a 'for' loop, what line 1 does is says to start RLevel at 0 and keep looping around while RLevel is still smaller or equal to 255 and also to increment RLevel by 1 each time it loops around. The part which says RLevel ++ means increment RLevel by 1.
The part inside this loop is an 'if' statement and it will execute the command inside the curly brackets only if the statement within the normal brackets is true. Lets look at the statement within the normal brackets, its telling Photoshop to get the red channel in document one then getting the histogram array. The histogram that we looked at didn't look like a row of boxes but in fact it is, for each each output value horizontally from zero to 255 is a corresponding vertical value. In the histogram we looked at there was only one output value which didn't correspond to a non-zero value so RLevel can be thought of as the output value. since we haven't included anything else in the brackets like an equals sign or a greater than sign then it will automatically only return true if the value returned from the histogram is non-zero and since there is only one non-zero value then this will be the R value. The command to execute if this is true is the break command, this will stop the loop so we won't go round again after we find the correct value. the two closing curly brackets are just to close the 'for' loop and the 'if' statement.
Step 8:
Below I have included the full code up to this point, including the G and B value checks:
preferences.rulerUnits = Units.PIXELS;
displayDialogs = DialogModes.NO
open(File(openDialog()));
var docRef_1 = activeDocument;
docRef_1.backgroundLayer.duplicate();
var white = new SolidColor();
white.rgb["hexValue"] = "ffffff"
var black = new SolidColor();
black.rgb["hexValue"] = "000000"
foregroundColor = black;
backgroundColor = white;
docRef_1.selection.selectAll();
docRef_1.selection.fill(white);
docRef_1.selection.deselect();
docRef_1.layers[0].duplicate();
docRef_1.activeLayer = docRef_1.layers[0];
docRef_1.activeLayer.applyAverage();
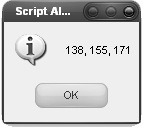
for (RLevel = 0; RLevel <= 255; RLevel ++) { if (docRef_1.channels["Red"].histogram[RLevel]) { break; } } for (GLevel = 0; GLevel <= 255; GLevel ++) { if (docRef_1.channels["Green"].histogram[GLevel]) { break; } } for (BLevel = 0; BLevel <= 255; BLevel ++) { if (docRef_1.channels["Blue"].histogram[BLevel]) { break; } } Now we are going to check to se if these last bits of code actually work, to do this we will use an alert box and make it display the RGB values. Insert this code below the rest of your code:
alert(RLevel + ", " + GLevel + ", " + BLevel)
The alert box should contain the RGB values check these by double clicking on the foreground color then using the eyedropper. If the colors match then delete this alert box code and move on, if they don't match or it's not working just copy and paste the full code above and try again.
Step 9:
From now on I won't go into much detail as most of the things coming up have been covered already. Now depending on the average color we want to edit it in different ways. The way we will edit it is fill this layer with a solid color change its blending mode to color. The color of this layer will depend on the average color; if the average color is mostly blue we will use the color yellow, mostly green we will use magenta and mostly red we will use cyan. I'm going to show a long way of doing this just to demonstrate some extra commands. In this step we will get the RGB values for this color. The code for this is:
var R = 0;
var G = 0;
var B = 0;
if (RLevel > GLevel && RLevel > BLevel) {R = 255;
}
if (GLevel > BLevel && GLevel > RLevel) {G = 255;
}
if (BLevel > RLevel && BLevel > GLevel) {B = 255;
}
Here we are first defining the variables R,G and B and setting them to 0 then we have three 'if' statements so for the first one it is basically saying if RLevel is bigger than GLevel and BLevel then set the R value to 255. The same goes for the G value and B value, if in the off chance any of the values are equal then all values will remain 0.
Step 10:
Now we will create a new color then fill the layer in with this color, using exactly the same commands that we used in step 4 and 5. The code for doing this is:
var color = new SolidColor();
color.rgb.red = R;
color.rgb.green = G;
color.rgb.blue = B;
docRef_1.selection.selectAll();
docRef_1.selection.fill(color);
docRef_1.selection.deselect();
The only difference is that we called the variable color, just because this could either be red, green or blue; in my case it was blue.

Step 11:
Now we want to invert the color of this layer then change its blending mode to color and its opacity to 50%. The code for doing this is.
docRef_1.activeLayer.invert();
docRef_1.activeLayer.blendMode = BlendMode.COLORBLEND;
docRef_1.activeLayer.opacity = 50;
docRef_1.activeLayer.merge();
Each command here explains itself fairly well, this process would be done in Photoshop by hitting Ctrl+I then changing the blending mode and opacity manually in the layers panel then hitting Ctrl+E.
Step 12:
Now we want to add the border, the way I did this was to have this script enlarge the canvas then create a new layer and do a select all and fill this layer white. Before we do this we need to have the script calculate the size of the border depending on the size of the image. After a bit of trial and error I found a good border thickness to be 7.5% of the smaller dimension; either the height or the width. To implement this we first need to find which is smaller the width or the height then to make the border size equal to 7.5% of this. Lastly we have to double this thickness then add it to the width and the height to get the new canvas size. To simplify this slightly I just took 15% rather than 7.5% then I didn't need to double it before I added it on. The code for this stage is:
var width = docRef_1.width;
var height = docRef_1.height;
if (width <= height) { var borderSize = Math.round(width * 0.15); } else { var borderSize = Math.round(height * 0.15); } docRef_1.resizeCanvas(width + borderSize, height + borderSize); Okay, the first two lines are easy; we are setting a variable for the width which is equal to the document width and a variable for the height which is equal to the document height.
Then we have an 'if' statement which says if the width is smaller or equal to the height then execute the command in the curly brackets. The first part of this command looks familiar; just creating a variable, the second part uses a Math function called round, what this does is to round whatever is in the brackets to the closest integer or whole number. We need this because some of the time 15% of the width will be a decimal number.
After this 'if' statement we have an 'else' statement which means if the width is larger than the height then it will execute the command contained within these curly brackets; which is similar to the other command.
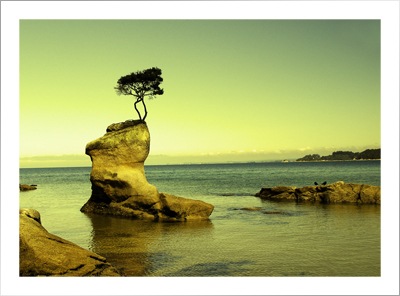
The last line resizes the canvas to a width and height equal to borderSize added to the width and height. Note that the 1px border around these images is just added in because the background is also white.
Step 13:
Now if you tested the script you might think it looks fine however the background layer will resize to fit any size of canvas so we need to have the script create a new layer with the border in it then merge this layer and the image layer. The code for this is:
docRef_1.artLayers.add();
docRef_1.activeLayer.move(docRef_1.backgroundLayer, ElementPlacement.PLACEBEFORE);
docRef_1.selection.selectAll();
docRef_1.selection.fill(white);
docRef_1.selection.deselect();
docRef_1.layers[0].merge();
The only part of this code that we haven't seen before is the move command which we are using on the active layer which will be the one we just created. The first part inside the brackets is the reference layer which we have defined as the background layer, the second part tells Photoshop to move the active layer to before the reference layer using ElementPlacement.PLACEBEFORE.
Step 14:
Now we are going to add what will become the shadow, at the moment this will just be a layer directly before the background layer filled with black. Here is the code:
docRef_1.artLayers.add();
docRef_1.activeLayer.move(docRef_1.backgroundLayer, ElementPlacement.PLACEBEFORE);
docRef_1.selection.selectAll();
docRef_1.selection.fill(black);
docRef_1.selection.deselect();
This code is nearly exactly the same as the code in the last step except that this is filled black and we don’t merge it yet. If you test it shouldn't look any different from what it did in the last step.
Step 15:
Okay now we want the script to resize the canvas so it can fit the image at any angle; this requires good old bit of Pythagoras. The code for this is:
var width = docRef_1.width;
var height = docRef_1.height;
var newSize = Math.round(Math.sqrt(width * width + height * height)) + borderSize;
docRef_1.resizeCanvas(newSize, newSize);
The first two lines create new variables for the width and height. The next line create a variable for the new size of the document, the Math.sqrt function in this takes the square root of the number in the brackets and we add the borderSize just to account for the shadow we will create. The last line is resizing the canvas.

Step 16:
Now to create the shadow, we want the script to add a gaussian blur to the black layer we created earlier. I found that the value for the gaussian blur should be a third of the borderSize and the opacity, 50%. Here's the code for this part:
docRef_1.activeLayer.applyGaussianBlur(borderSize / 3);
docRef_1.activeLayer.opacity = 50;
The first line is in the same for as the average blur which we made in step 5.
Step 17:
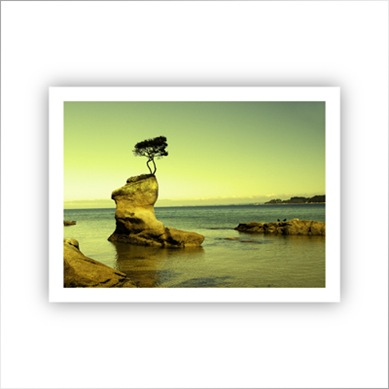
We now want the script to rotate both the image and the shadow then merge them, this gives a better result than merging them then rotating. We want the angle of rotation to be different each time but somewhere between -20° and 20°. The code for this is:
var angle = Math.round(Math.random() * 40) - 20;
docRef_1.activeLayer.rotate(angle, AnchorPosition.MIDDLECENTER);
docRef_1.activeLayer = docRef_1.layers[0];
docRef_1.activeLayer.rotate(angle, AnchorPosition.MIDDLECENTER);
docRef_1.activeLayer.merge();
The Math.random function will select a number between 0 and 1, so this number is not an integer, this is why we have the rounding function in the first line. To manipulate this number so it is between -20 and 20 we have the script multiply it by 40 then subtract 20 from the rounded number. This number is stored in a variable named angle.
We then have the rotate command used on the active layer which is still the shadow layer, her define the angle to be our angle variable and the anchor to be in the middle. The rotation can be done in Photoshop by hitting Ctrl+T.
The last three lines select the image layer, rotate it then merge them.
Final Script:
preferences.rulerUnits = Units.PIXELS;
displayDialogs = DialogModes.NO
open(File(openDialog()));
var docRef_1 = activeDocument;
docRef_1.backgroundLayer.duplicate();
var white = new SolidColor();
white.rgb["hexValue"] = "ffffff"
var black = new SolidColor();
black.rgb["hexValue"] = "000000"
foregroundColor = black;
backgroundColor = white;
docRef_1.selection.selectAll();
docRef_1.selection.fill(white);
docRef_1.selection.deselect();
docRef_1.layers[0].duplicate();
docRef_1.activeLayer = docRef_1.layers[0];
docRef_1.activeLayer.applyAverage();
for (RLevel = 0; RLevel <= 255; RLevel ++) { if (docRef_1.channels["Red"].histogram[RLevel]) { break; } } for (GLevel = 0; GLevel <= 255; GLevel ++) { if (docRef_1.channels["Green"].histogram[GLevel]) { break; } } for (BLevel = 0; BLevel <= 255; BLevel ++) { if (docRef_1.channels["Blue"].histogram[BLevel]) { break; } } var R = 0; var G = 0; var B = 0; if (RLevel > GLevel && RLevel > BLevel) {R = 255;
}
if (GLevel > BLevel && GLevel > RLevel) {G = 255;
}
if (BLevel > RLevel && BLevel > GLevel) {B = 255;
}
var color = new SolidColor();
color.rgb.red = R;
color.rgb.green = G;
color.rgb.blue = B;
docRef_1.selection.selectAll();
docRef_1.selection.fill(color);
docRef_1.selection.deselect();
docRef_1.activeLayer.invert();
docRef_1.activeLayer.blendMode = BlendMode.COLORBLEND;
docRef_1.activeLayer.opacity = 50;
docRef_1.activeLayer.merge();
var width = docRef_1.width;
var height = docRef_1.height;
if (width <= height) { var borderSize = Math.round(width * 0.15); } else { var borderSize = Math.round(height * 0.15); } docRef_1.resizeCanvas(width + borderSize, height + borderSize); docRef_1.artLayers.add(); docRef_1.activeLayer.move(docRef_1.backgroundLayer, ElementPlacement.PLACEBEFORE); docRef_1.selection.selectAll(); docRef_1.selection.fill(white); docRef_1.selection.deselect(); docRef_1.layers[0].merge(); docRef_1.artLayers.add(); docRef_1.activeLayer.move(docRef_1.backgroundLayer, ElementPlacement.PLACEBEFORE); docRef_1.selection.selectAll(); docRef_1.selection.fill(black); docRef_1.selection.deselect(); var width = docRef_1.width; var height = docRef_1.height; var newSize = Math.round(Math.sqrt(width * width + height * height)) + borderSize; docRef_1.resizeCanvas(newSize, newSize); docRef_1.activeLayer.applyGaussianBlur(borderSize / 3); docRef_1.activeLayer.opacity = 50; var angle = Math.round(Math.random() * 40) - 20; docRef_1.activeLayer.rotate(angle, AnchorPosition.MIDDLECENTER); docRef_1.activeLayer = docRef_1.layers[0]; docRef_1.activeLayer.rotate(angle, AnchorPosition.MIDDLECENTER); docRef_1.activeLayer.merge();

Post a Comment