

9:42:00 PM
Step 1
Open the photo that you want to work with in Adobe Photoshop. If you don’t have a photo save the next one on your computer and open it in Adobe Photoshop:

Step 2
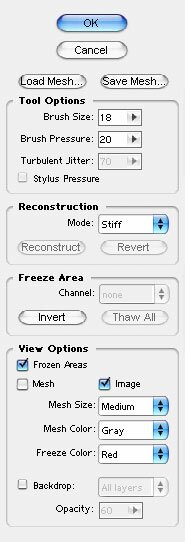
Select Filter > Liquefy to add the comic effect on the picture. In the window which appears choose the Warp Tool. On the right side, in the same window, make the settings like in the next image:
Step 3
Ok. With these settings, take the right corner of the mouth and drag it up and to the right. Make this carefully and in two or three steps. The result should be something like this:

Step 4
Now make the effect on the left mouth corner. Like in the previous step, do this carefully and in a few steps:

Step 5
If it’s necessary, adjust the middle of the mouth and this should be the result:

Step 6
Use the same effect to distort the eyebrows. Make this in a few steps and. This is my result, a funny effect on my picture:


Post a Comment