

12:16:00 AM
Step 1

Step 2
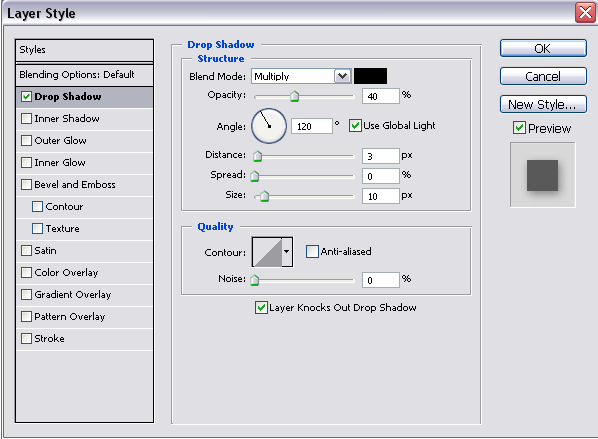
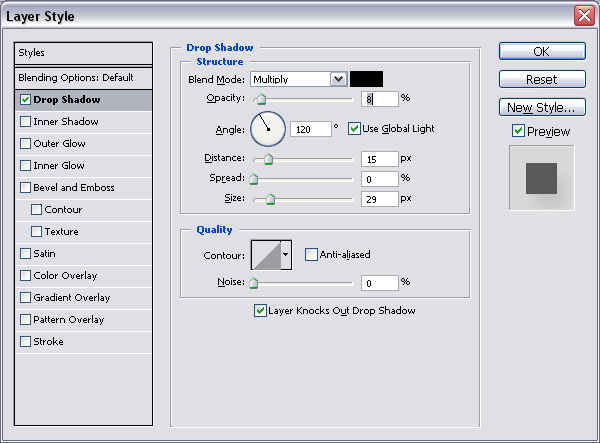
Select Layer > Layer Style > Drop Shadow to apply the drop shadow effect. When applying the effect use the next settings:
Step 3
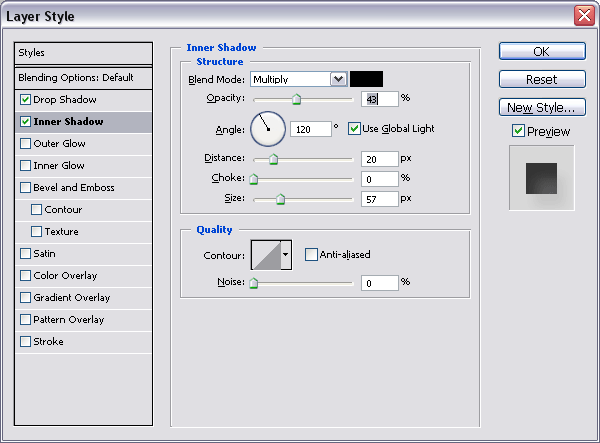
Apply the inner shadow effect on your layer. To do this select Layer > Layer Style > Inner Shadow and set the next settings in the window which appears:

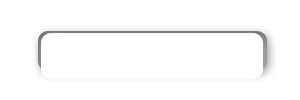
Here is an intermediary result:

Step 4
Draw another rectangle, like in the next picture, with a white color and “rasterize” it. To make this step choose your layer in the Layers Tab and select Rasterize. Now you can work better on this layer:
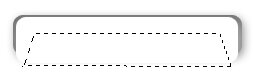
Step 5
Using the “Polygonal Lasso Tool” (find it in the Tools Tab) make a selection like in the next picture (make this selection on the last rectangle that you drew, the white rectangle):
Using the DELETE key delete the selected area:

Step 6
Select a small brush in the Tools Tab, like “Soft Rounded 45 pixels” and delete the bottom corners of the white polygon like here:

Set the “Opacity” to 50% in the Layers Tab:

Step 7
Draw another rectangle with a white color and place it in a position like here:

Set the “Opacity” of this layer to 12%, and the result should be something like this:

Step 8
Select the layer “Shape 1” in the Layers Tab. In the Tools Tab select the Horizontal Type Tool and type a text on your button with a grey color:

Step 9
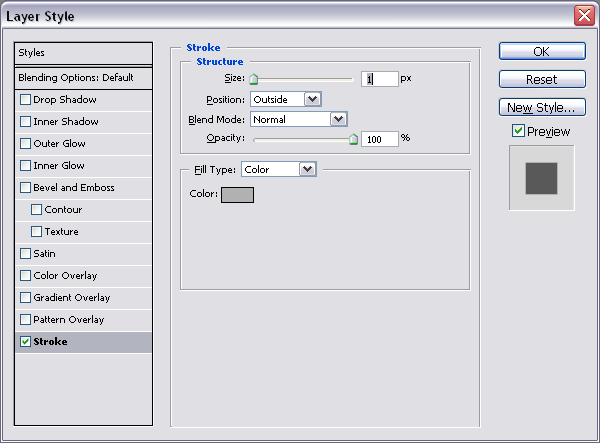
Set a stroke to your text. To do this select, on the layer with the text, Layer > Layer Style > Stroke. Apply the next settings to the stroke:
And another intermediary result:

Step 10
A little bit more color on your text and that’s the result:

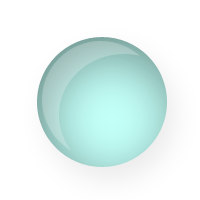
12:14:00 AM
Step 1

Step 2
Select Layer > Layer Style > Drop Shadow to add shadow to your layer. Apply the next settings for this effect:
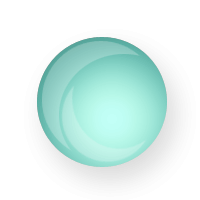
Step 3
Apply the “Inner Shadow” effect. To do this, select Layer > Layer Style > Inner Shadow with the next settings:
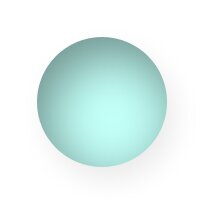
After these two steps the result should be something like this:
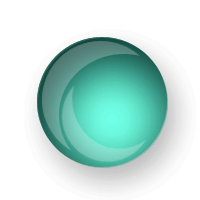
Step 4
Create a new sphere with a white color and “resterize” the layer which contains this sphere:
Step 5
Make a selection on this sphere like this:

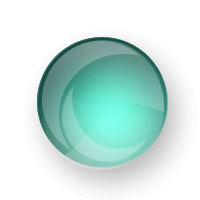
Delete the selected area and set the opacity for this layer to 25%:
Step 6
Duplicate the layer, resize it and rotate it, move it like below (to make these actions check the Edit options menu):

Step 7
Duplicate the layer “Shape 1” and set the “Blending Mode”, in the Layers Tab, to “Pin Light”:
Step 8
Duplicate it again and set the “Blending Mode” to “Multiply”. Make this step again and this is the result:
Step 9
You can now play with the details and obtain a nice translucent ball:
12:12:00 AM
Step 1

Step 2
Create a new document in Adobe Photoshop with the size 360x600 pixels. Drag the picture which you saved in this new document and place it at the bottom. Draw now a rectangle in a new layer with a light blue color like #7AB5FD; set the “blending mode” for this layer, in the Layers Tab, to “Soft Light”:

Step 3
“Rasterize” the blue rectangle. To do this, right click in the Layers Tab, and select Rasterize Layer. Now, with a small brush like “Soft Rounded 30 pixels”, and delete the area which contain the shadow of the headphones:

Step 4
Duplicate the layer “Layer 1” and delete an area like here with same brush tool:

Add the motion blur effect on this layer. To do this select Filter > Blur > Motion Blur with the next settings:

After these steps your result should be something like this:

Step 5
Select the layer “Layer 1 copy” in the Layers Tab and set the opacity to 72%; move it in the position like here:

Step 6
Duplicate the layer “Layer 1 copy” and apply the motion blur effect with the next settings:

Move the layer in the position like here and set the opacity to 50%:

Step 7
Select the layer “Shape 1” and delete an area like in the next picture, using a “rounded soft brush 100 pixels”:

Step 8
Draw a rectangle, with a yellow color, above all layers, and place it lake here; set the “blending mode” to “Soft Light”:

Step 9
With a “Soft Rounded Brush 200 pixels” delete an area and here’s the result:

Now you can play with the contrast and luminosity, or lighting effect to get this:

12:10:00 AM
Step 1
Save the next pictures on your computer, if you don’t have others to complete this tutorial:


Step 2
Create a new document in Adobe Photoshop with the size 740x540 and a white background. Import the picture “kids1.jpg” in your document:

Flip the picture horizontal and place it in the position like here (to flip the picture horizontal select Edit > Transform > Flip Horizontal and to move it just drag the picture in the new position):

Step 3
Make a selection using the Rectangular Marquee Tool and use the CTRL+C, CTRL+V key combination to copy and paste the selected area:


Step 4
Select Edit > Transform > Scale and transform the scale of the new layer like here:

Drag the layer “layer 2” below the layer “Layer 1”:

Step 5
Select the layer “Layer 1” in the Layers Tab and delete an area like in the next picture, using a brush like “Soft Rounded 100 pixels”:

Step 6
Add a nice logo to your site:
![]()
Step 7
Make a border around the header using a brush like “Rough Round Bristle” with the size 23 pixels, and a dark red color:

Step 8
Import the picture “kids3.jpg” on the scene, resize it and rotate it like here (to resize it select Edit > Transform > Scale and hold down the SHIFT key when making the transformation; to rotate it, select Edit > Transform > Rotate):

Step 9
Duplicate the layer which contains the border, resize it, rotate it and move it in the position like here, above the next picture (drag the layer in the Layers Tab above the layer which contains the picture):

Add the color overlay effect on the new layer; to make this, select Layer > Layer Style > Color Overlay and choose a yellow color in the window that appears:

Step 10
Import the picture “kids4.jpg” on the scene and repeat the step 8 and 9 (resize it and add border to this picture, but this time set the color to green):

Step 11
Repeat the step 10 again, this time for the picture “kids5.jpg” and for the picture “kids2.jpg”:

Step 12
Apply some kind of text on your categories, and a welcome text, and you have a nice layout for your kid’s website:

