

9:43:00 PM
Step 1

The result should be something like this:

Step 2
Distort the rectangle using Edit > Transform > Perspective and dragging the bottom left corner to the center of the rectangle:

Step 3
At the top of the rectangle draw an ellipse and apply the gradient overlay with the settings:

This is the result:

Step 4
Select the layer which contains the rectangle, in the Layer Tab, and make a selection like here:

Now select Select > Inverse, and use the DELETE key to delete the selected area. The result should be like this:

Step 5
You can draw another black rectangle and delete the area until you obtain a triangle, duplicate it and move it. Duplicate it and move it again, until the result looks like this:

Step 6
You can add other graphic elements:

9:42:00 PM
Step 1
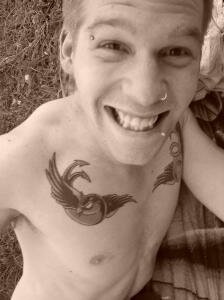
Step 2
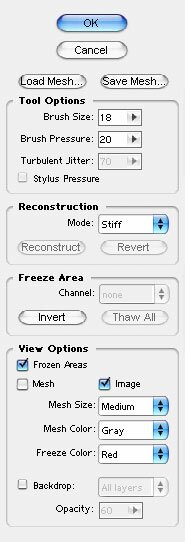
Select Filter > Liquefy to add the comic effect on the picture. In the window which appears choose the Warp Tool. On the right side, in the same window, make the settings like in the next image:
Step 3
Ok. With these settings, take the right corner of the mouth and drag it up and to the right. Make this carefully and in two or three steps. The result should be something like this:

Step 4
Now make the effect on the left mouth corner. Like in the previous step, do this carefully and in a few steps:

Step 5
If it’s necessary, adjust the middle of the mouth and this should be the result:

Step 6
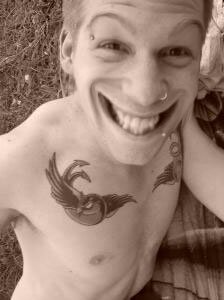
Use the same effect to distort the eyebrows. Make this in a few steps and. This is my result, a funny effect on my picture:
9:38:00 PM
Step 1

Step 2
First, “rasterize” the layer which contains the letter “O”. Select the Magic Wand Tool in the Tools Tab and select white color on the stage like here:

Step 3
Apply the feather effect on the selection, using the 6px feather radius, and delete de selected area using the DEL key:

Step 4
Duplicate the layer which contains the “O” (right click in the Layers Tab on the layer and choose Duplicate
Step 5
With a “Soft Round 465 pixels” brush, delete the area on the top of the new layer. The result should be something like this:

Step 6
On a new layer type a new “O” with white color and “rasterize” the new layer like on the step 2. Use the Magic Wand Tool to select the white zone on the new layer. Choose Select > Feather and set the feather radius to 30 pixels. Use the DEL key to delete the selected area. This should be your result:

Step7
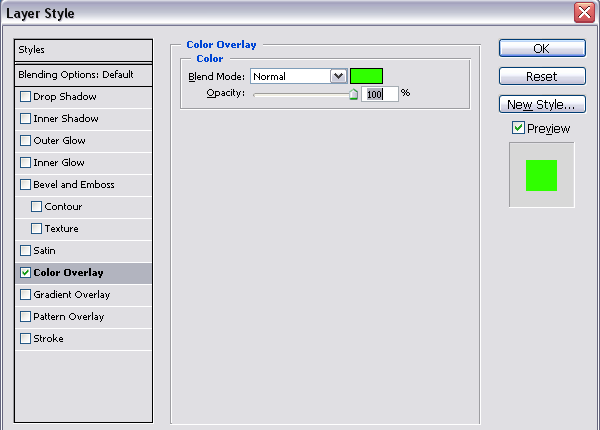
Duplicate the layer again and set the color overlay effect on the new layer. To do this step select Layer > Layer Style > Color Overlay, and using the next settings apply the effect:
Step 8
Delete the bottom side of the new layer using the “Soft Rounded 465 pixels” brush. This is an intermediary result:

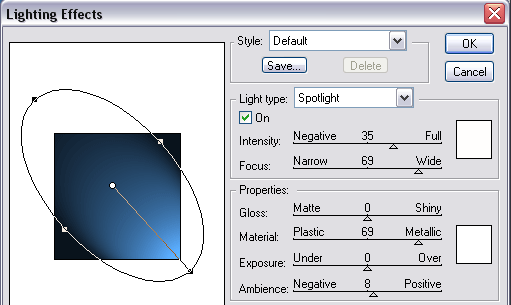
Step 9
Select the layer “background” in the Layers Tab and apply the lighting effect on it. To do this select Filters > Render > Lighting Effects. Use the next settings when you apply this effect:
Step 10
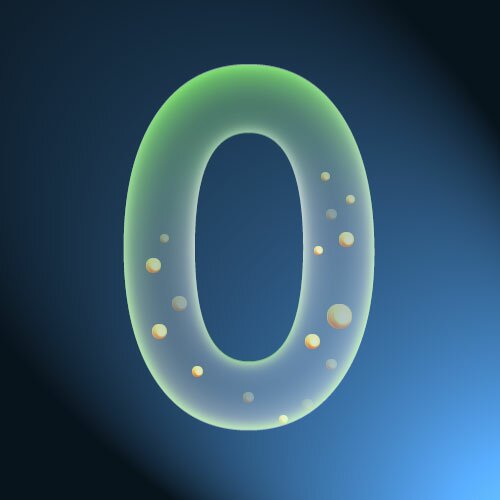
Add other elements if you want. This is my result:
9:33:00 PM
Introduction
1. Studying the new environment
What we do as the first step is loading the new environment for our lion into Photoshop, and study it. The things to looking for are: where the light comes from, where are the shadows situated, where is the ground plane situated (in the example below we cannot see it, but we must guess it by looking at the grass).

2. Decide where to place the creature
Now we must decide where to place the lion, so we make a selection using the “Magnetic Lasso” tool combined with “Rectangular Marquee” tool(adding them) to do a selection like the one showed below. Then copy the selected area, and paste it again, in a different layer, just where it was placed before. The image must look exactly how it was looking before, after doing this operation.

3. Select the creature from it’s original environment
Open the photo where you have the creature, and select it using again the powerful “Magnetic Lasso” tool. This tool is very efficient when the selected area is very clearly defined from it’s background. You can use other selecting techniques as well.
The result should look like in the image bellow. Here we are not interested in lion’s legs details
because they will be hidden in the grass anyway.

4. Pasting the selection
We copy the selected lion from it’s original picture, and paste it as a new layer into our working picture. It must be placed between the environment layer and the grass layer created on step 2. The image should look like this:

5. Erasing the grass
We must erase some of the grass from the grass layer created on step 2. We will keep only the taller grass, so we can see the lion through it. We use for these the “Eraser” tool, but with a very low opacity (around 25%). In this case it doesn’t be perfectly erased, because it will be a very dark scene anyway.

6. Editing the lion
In this step we are going to edit the lion, so it blends into a warm dusk environment from the more gray and cold original environment. First we must pick the color of the sun lit grass using the “Eyedropper” tool. We then use this color to fill the lion’s layer with it at 15% opacity and keeping it’s transparency locked (we don’t want to fill the whole layer, only the lion). Check the layer’s keep transparency, because we only want to paint the creature pick the “Brush” tool, pick a normal round fuzzy brush with it’s size set to a pretty big value (for me, working on a 1024x768 picture was around 125 px). Set it’s “opacity” and “flow” to low values (around 28%) and paint the creature with a black color, making shadows with respect to the light source position(the sun in this case).
Do this until you are satisfied with the results. In my case, I had to deal with a glow effect, because the light source was behind our subject, so the lit areas are very intense. In order to accomplish this effect I used the “Dodge” tool to lighten the lion’s edges. Care must be taken at casted shadows, like the one from the trees in my example. The result is shown below:

7. Adding more detail
To obtain the glow effect that we were speaking in step 6, we must unlock lion’s layer transparency and use the “Blur” tool only on the lighten areas, not on the dark ones. Then pick again the “Brush” tool, keeping the settings we used before. The lion casts also a shadow on the grass, so we need to paint the lower part of the grass in the grass layer, to make it darker, like in the picture below. In a most clear environment (like a lion on a road for example), we would have to do a more clear casted shadow, technique which will be cover in another tutorial.

8. Finishing up
The lion looks pretty good, but it also shows an unnatural smoothness. To make this more beliveable we duplicate the lion’s layer, and put it’s copy just above it. Set the new layer’s blending mode to “Multiply”. Then filter this layer using a “Sharpen” filter, and adjust it’s opacity until it looks natural.
Some more “Dodge” touches may be useful on lion’s hair, because light is not completely occluded by hair.

Layers layout
Here is my final layout of the layers.

Conclusion
There are more details that can be added, you can spend hours detailing every shadow of every grass thread, or even use a fur texture on the lion, not using a “Sharpen” filter as I did, but the basic workflow was described above.
9:31:00 PM
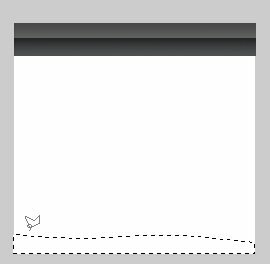
Step 1

Make a new layer (Layer->New Layer). Now, with your new Layer selected and with your Rectangular Marquee Tool (M) draw a rectangular in the upper part of the white rectangular. Be careful to respect the sizes. Once you have the selection take your Gradient Tool and set like this.

Use #000000 for the dark part and #4f5052 for the light part. Now fill the selection with this gradient color. Should look like this.

Step 3
It’s time for a new Layer (Layer->New Layer). Now, again with your new layer selected and with your Rectangular Marquee Tool (M) draw a rectangular in the upper part of the black rectangular. Fill it with and set the opacity to 29%. This you will add a glassy effect to the box.


Step 4
First make a new layer. Then select your Polygonal Lasso Tool (L) and draw a shape just like, at least try to make one that looks like this at the bottom of the box.
Now fill it up with green (#86c55d). Make a new layer and select the upper part of the new green shape, so that we can add a glassy effect. Fill up with white the new selection and set the opacity to 29%.

Step 5
Select the second layer (the one with the white rectangular) and go to Layer->Layer Style->Stroke.

It’s tome for some shadows. Go to Layer->Layer Style-> Drop Shadow

Step 6
Make a new layer, and the last, and with your Rectangular Marquee Tool (M) draw a rectangular in the white space of the box, to define the writing area. Go to Layer->Layer Style->Bevel and Emboss and set it like this.

Add some text and the box is finished.

9:29:00 PM
Step 1
Now select your Gradient Tool (G) and set 2 colors. #f7efe4 for the light one and #f7dcc9 for the darker one. Fill the new document with these colors and after that drag the image with umbrella in the right corner. If you have any parts that don’t look good, Use your Clone Stamp Tool to fix them.

Step 2
In the right corner of the screen you have a box that shows you the layers you are working with. Ctrl+Left Click on one and choose Merge Layer. Now select Rounded Rectangle Tool (U) and from the options under the Menu, choose the rectangle in the middle.

Now make a rectangle over the one you have and then go to Window->Paths and now, in the same box with the layer you will see at the bottom 3 circles. Choose the third.

Now go to Select->Inverse and after that press Delete.
Step 3
Make new document 700X500 pixels with white background. Drag the header in the new document. Now you will for sure the round corners. Go to Layer-> Layer Style-> Drop Shadow.

Now the layout looks like this. Only a few steps and it are done.

Step 4
The menu will be simple. Use the 3 picture. First will be the box. Open the image, drag it into the layout and Go to Layer-> Layer Style-> Drop Shadow. Set everything like before, but choose black, not that grey. Add the options name below.

Do the same with the other and put them like I did. In this way it won’t look common. Here are the images.


Step 5
Add some text and the title, for the title you should use #a81a25, and we are done.

